Windows Security is an effective program that safeguards your computer against security threats such as viruses, malware, PUPs, and more. Additionally, it includes a functionality that shields your computer from ransomware attacks.
Despite the effectiveness of Windows Security, certain malware or spyware can deactivate it. Some malware programs are specifically designed to deactivate Windows Security as a first step to avoid detection. To address this issue, Microsoft has introduced a new feature called Tamper Protection.
Tamper Protection is a feature within Windows Security that prevents malicious applications from altering Microsoft Defender settings. Essentially, this feature blocks malicious apps from disabling Windows Security, which includes real-time and cloud-delivered protection.
If you are using the most recent Windows 11 build, the Tamper Protection feature may be activated by default. However, if it is deactivated, a yellow warning will appear in the Windows Security app under Virus & Threat Protection.
In the event that your PC has recently been infected, there is a possibility that a malicious program has disabled the feature. Therefore, it is advisable to manually enable the feature. Additionally, if you are utilizing a third-party security program, the feature will be disabled.
RELATED LINKS
Free Windows and Microsoft Office product keys
Download Microsoft Office / Windows OS for FREE
How to Remove Bloatware From Windows 11
4 Simple way to Activate Windows 10 for FREE without additional software
7 Ways to Boot Windows 11 Into Safe Mode From the Lock-Screen
How to Fix Error Code 0xc0000034 in Windows 10
Tamper Protection On or Off?
It is crucial to inquire about the significance of enabling a new feature before proceeding. Tamper Protection, being an integral part of Windows Security, poses no harm when kept enabled.
Enabling Tamper Protection allows the Windows Security app to thwart any attempts by malicious apps to disable it. In the most recent Windows 11 versions, this security measure is already activated.
Nevertheless, in case this feature is deactivated, it is advisable to conduct a comprehensive antivirus or antimalware scan and re-enable Tamper Protection.
If you utilize third-party antimalware tools such as Malwarebytes, Norton, etc., you have the option to disable Tamper Protection. Nonetheless, it is strongly advised against disabling this feature, particularly if you frequently download and install files from the internet.
Tamper Protection plays a crucial role in safeguarding your computer against malicious apps.
How to Activate Tamper Protection in Windows 11\
1 Click on the search bar in Windows 11 and type in "Windows Security" to begin the process of enabling tamper protection, a crucial feature for all Windows 10/11 users.
2. On Windows Security, click on the Virus & Threat Protection option.
3. Now click Manage Settings under the Virus & Threat Protection settings.
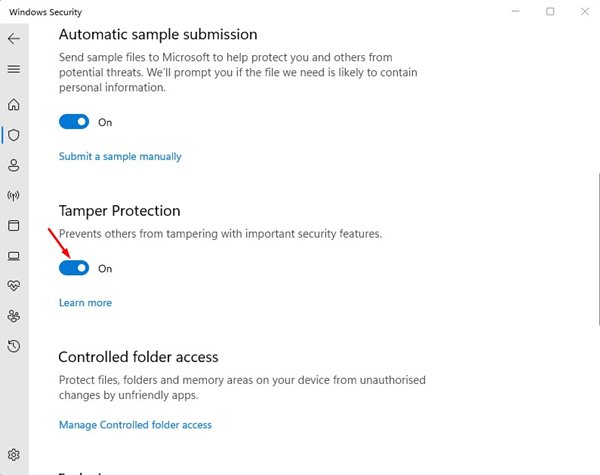
4. On the Next page, find the Tamper Protection option. You need to change the Tamper Protection setting to On.

To resolve the issue of Tamper Protection not turning on, it is likely that certain Windows Security or system files have become corrupted. Follow these steps to fix the problem and activate the Tamper Protection feature.
1. Repair Corrupted System Files
By replacing the corrupted system files, you can restore the functionality of the Tamper Protection feature. Here's how to fix corrupted system files on Windows 11:
1. Search for CMD in Windows 11. Then, right-click on the Command Prompt and choose the "Run as administrator" option.
2. When the Command Prompt opens, execute these commands one by one.
DISM /Online /Cleanup-Image /CheckHealth
DISM /Online /Cleanup-Image /ScanHealth
DISM /Online /Cleanup-Image /RestoreHealth
3. After executing these commands, execute this command and press Enter. sfc /scannow
Once the scan is complete, restart your Windows 11 PC.
2. Reset the Windows Security App
If you still can’t enable the tamper protection, it’s time to reset the Windows Security app. Here’s what you need to do.
1. Launch the Settings app on your Windows 11.
2. Next, switch to the Apps at the left pane.
3. On the right side, click on Installed Apps.
4. Find Windows Security and click on the three dots next to it. On the menu that appears, select Advanced Options.
5. On the next screen, click Reset.
Once the process has been completed, proceed to reboot your Windows 11 computer. Activating or deactivating the Tamper Protection feature is a straightforward task, particularly on the Windows 11 OS. We trust that this article has provided you with valuable information. Feel free to share it with your acquaintances as well. Should you have any uncertainties, kindly inform us in the comment section below.


No comments:
Post a Comment