
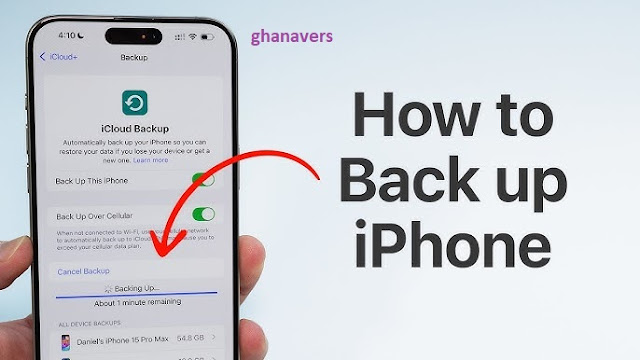
iCloud provides a convenient method for backing up data on your iPhone. Apple allocates 5 GB of complimentary iCloud storage, which can be quickly consumed when backing up photos, videos, and application data. Depending on the volume of your backup, it may be necessary to upgrade your iCloud storage, which will result in a monthly charge based on the selected storage capacity.
If you are seeking a free or cost-effective alternative to back up your iPhone without utilizing iCloud, this guide will assist you. You will discover how to back up your iPhone using free tools available on both Mac and Windows, as well as third-party applications, and by manually downloading data from your iPhone
.
Methods for Backing Up Your iPhone Without iCloud
You can utilize the Finder application on a Mac or the Apple Devices app or iTunes on Windows to back up your iPhone without relying on iCloud. Additionally, numerous third-party software options are available that offer enhanced features, including selective backups and wireless backup capabilities. Furthermore, you can manually back up specific data types, such as contacts, photos, and documents, and store them locally on your iPhone.
1 .Backing up your iPhone using a Mac .
The Finder application on macOS provides a built-in backup tool that allows you to create a comprehensive copy of your iPhone's data, encompassing applications, music, photos, videos, contacts, and more. Through Finder, you can easily view and manage your backup files, remove outdated backups, and transfer backups to external storage to optimize space on your Mac. Additionally, you can manage backups that were previously created with iTunes and set up automatic backups whenever your iPhone is connected to your Mac.
Instructions for backing up your iPhone via the Finder application on Mac:
Step 1: Connect your iPhone to your Mac using a USB cable. Upon the initial connection, grant your Mac permission to access the files on your iPhone and trust the Mac on your iPhone to enable data access. Follow the on-screen instructions to complete this process.
Step 2: After establishing the connection, launch the Finder app and select your iPhone from the ‘Locations’ section.


Step 4: Opt to back up all data from your iPhone to your Mac by selecting the option ‘Back up all of the data on your iPhone to this Mac.’ Additionally, you have the option to encrypt your backup. Enabling encryption ensures that all your passwords and sensitive information are included in the backup. It is crucial to remember the password you create for this purpose, as forgetting it will prevent you from accessing the backup. If you decide against encryption, please note that sensitive information such as passwords will not be included in the backup.
Step 5: Click on ‘Back Up Now.’ If prompted, please enter the password on your iPhone. The duration of the backup process may vary based on the size of the backup file.
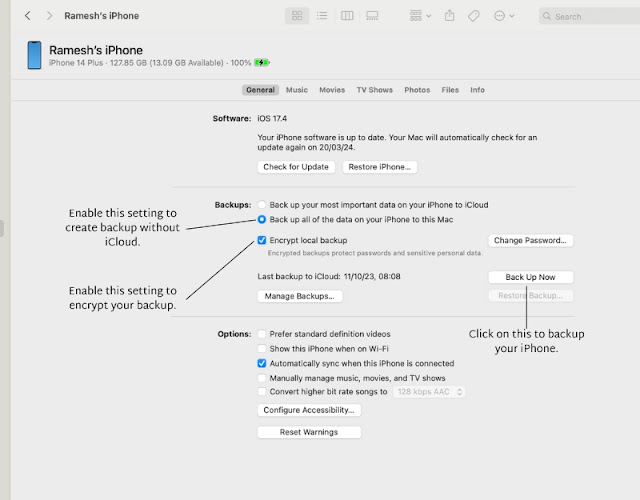
Step 6: You will receive a notification upon the successful completion of the backup process. To view your backups, select ‘Manage Backups.’ Please note that the new backup file will overwrite the previous one. If you wish to retain an older backup file, right-click on it and select ‘Archive.’ This action will safeguard the current backup from being replaced by subsequent backups.
Step 7: In the event that your Mac is low on storage, you have the option to transfer the backups to an external drive:
1. Connect an external drive to your Mac.
2. On your Mac, navigate to ~/Library/Application Support/MobileSync/Backup, where all backup files are located.
3. Copy the backup folders from your computer to the external drive.
4. After copying, you may delete the backups from your computer to reclaim disk space.
Step 8: To restore a backup, select the Restore backup option, choose the desired backup files, and proceed with the restoration. Ensure that your iPhone is connected to your Mac during the restoration process.
2.Windows: iTunes or Apple Device App
The Apple Devices application is compatible with Windows 10 and subsequent versions. For users with earlier versions of Windows, iTunes serves as an alternative. Both options necessitate connecting your iPhone to your PC. Through these methods, you can create multiple backups, access backup data, encrypt the backup information, remove outdated backups, and transfer data to external devices to free up space on your device.
Instructions for backing up your iPhone using the Apple Devices app:
1. Download and install the Apple Devices app from the Microsoft Store, where it is available at no cost.
2. Launch the application, accept the terms and conditions, and click on Start.
3.
Connect your iPhone to your PC, follow the on-screen prompts, and establish trust with the device. You will need to input your iPhone password to complete this process.
4. Click on the General tab.
5. In the backup section, select "Back up all of the data on your iPhone to this Mac," and then click on Backup Now.
6. The duration of the backup process will vary based on the size of the data, and you can monitor the progress in the status bar at the bottom of the screen.
7. Once the backup is complete, you have the option to restore the backup or manage it by clicking on the Manage Backups button in the backup section.
8. To restore a backup, click on Manage Backups and choose the specific backup you wish to restore.
To create a backup of your iPhone using the iTunes application on a Windows computer, please follow these steps:
Step 1: Install iTunes from the Microsoft Store on your computer, or access it via the provided link.
Step 2: Launch iTunes and sign in with the Apple ID associated with your iPhone.
Step 3: Connect your iPhone to the computer using a USB cable. If this is your first connection, your iPhone will prompt you to trust the computer. Select “Trust” and enter your passcode if required.
Step 4: Navigate to the General tab and locate the backup section.
Step 5: You will be presented with two backup options. Choose ‘Back up all of the data on your iPhone to this Mac‘ and then click ‘Back Up Now‘.
(Optional) To encrypt your backup, select the “Encrypt” option and create a password. Ensure that you remember this password.
Step 6: To locate your backup on your PC, follow the path: This PC > C: Drive > Users > [Your Username] > Apple > MobileSync > Backup.
Step 7: If you wish to remove any backups, open iTunes and select “Edit” > “Preferences” > “Devices.” Here, you will find a list of your backups. Choose the backup you wish to delete and click “Delete Backup.”
Step 8: To restore a backup to your iPhone, connect it to your computer with the USB cable, access your iPhone’s page in iTunes, click “Restore Backup,” select the desired backup, and then click “Restore Backup” once more
.
3.Using Third-Party Software (Windows and Mac)
Third-party software presents an excellent option for those seeking a thorough backup solution for their iPhone. After evaluating various tools, we identified AnyTrans by iMobile and iMazing as two dependable options for iPhone backup.
Both applications facilitate the straightforward creation and management of backups on your PC. They allow for the backup and restoration of specific data on your iPhone, support wireless backup capabilities, ensure secure and private backups, and offer data encryption to safeguard your information. Regarding data protection, both tools store backups locally on your device and support AES-256 encryption for iTunes backups.
I. iMazing 2

iMazing 2 serves as a comprehensive management solution for iPhone users, enabling the creation of local backups of iPhone data directly on a PC. This tool facilitates the transfer of various types of data, including messages, music, photos, and more, from iOS devices to computers. It supports wireless backup functionality and automatically generates backups when both the iPhone and Mac are connected to the same Wi-Fi network
.
Available for both Mac and Windows platforms, iMazing offers a free version alongside a paid option. The free version permits the creation of unlimited backups; however, restoring these backups requires the paid version. Users can also selectively back up specific files, such as photos, messages, and contacts. All backups are stored locally on the Mac and can be easily transferred to external storage devices.
 AnyTrans serves as a highly effective solution for backing up data from iPhones. It enables users to generate a comprehensive backup of their devices while accommodating a variety of content types, such as images, videos, music, call logs, and Safari browsing history. The application facilitates wireless backups and allows for the scheduling of regular backup intervals. AnyTrans automatically initiates a backup when both the iPhone and the PC are connected to the same network, and it offers management options for backups, including viewing, deleting, or transferring them to external storage
.
AnyTrans serves as a highly effective solution for backing up data from iPhones. It enables users to generate a comprehensive backup of their devices while accommodating a variety of content types, such as images, videos, music, call logs, and Safari browsing history. The application facilitates wireless backups and allows for the scheduling of regular backup intervals. AnyTrans automatically initiates a backup when both the iPhone and the PC are connected to the same network, and it offers management options for backups, including viewing, deleting, or transferring them to external storage
.
The software supports incremental backups, which focus on saving only the new or modified data since the last backup, thereby optimizing both time and storage space. Users also have the option to selectively restore specific files from a backup. Beyond its backup capabilities, AnyTrans includes additional features such as the creation of custom ringtones, management of iCloud files, transfer of WhatsApp data, and functionalities for screen mirroring and recording...