Showing posts with label how to. Show all posts

How to Fix the "Unfortunately, Settings Has Stopped" Error on Android


Unfortunately, Settings Has Stopped

How to Fix the "Unfortunately, Settings Has Stopped" Error on Android

Seeing the "Unfortunately, Settings has stopped" message is frustrating because it blocks the part of your phone you need to fix almost everything else. The good news is that this error is usually fixable at home.

It often shows up after a bad app update, damaged cache files, low storage, or a small Android glitch. In some cases, a buggy system update triggers it. Start with the easy fixes first, then move to the stronger ones only if the crash keeps coming back.

Start with the quick fixes that solve the problem most often

Before changing anything, close your recent apps and check how wide the problem is. If only Settings crashes, the issue may be tied to that app's files. If other apps freeze too, the phone may be short on storage or stuck in a larger system glitch.

person-troubleshooting-modern-smartphone-d2582379

Restart the phone and open Settings again

A restart clears temporary bugs and shuts down stuck background tasks. It also gives Android a clean chance to reload system apps, including Settings.

After the phone turns back on, wait a minute before testing. Then open Settings again and tap around for a few seconds. If it works, the problem was likely a short-lived system hiccup.

Free up storage space if the phone is almost full

Android needs free space to handle app data, updates, and temporary files. When storage is nearly full, even system apps can start crashing.

Delete unused apps first because they free space fast. Then remove old downloads, duplicate photos, and large videos you no longer need. If your phone has a built-in storage tool, use it to find the biggest space hogs.

Even a few gigabytes of free room can help. After clearing space, restart the phone and test Settings again.

Check for a stuck app or recent change that caused the crash

Think back to what changed before the error started. A new app, a fresh update, a permission change, or a theme tool can trigger a Settings crash.

This matters most if the error began the same day you installed something. Uninstall the newest apps first, especially launchers, cleaners, battery savers, VPNs, or overlay tools. Those apps can interfere with system menus and permissions.

If the crash started after changing one setting, try reversing that change if you still can. A small rollback sometimes stops the loop.

Clear the data that may be breaking the Settings app

If the quick fixes don't help, the next step is to clear damaged app files. In simple terms, cache is temporary data. App data is deeper storage that keeps the app's saved state and preferences.

Clearing cache is the safer first move because it usually doesn't reset anything important. Clearing app data is stronger, but it may reset parts of your Settings app, such as preferences or defaults.

Clear the cache for Settings and Google Play services

Cached files can become corrupted after updates or interrupted background tasks. When that happens, Settings may crash every time Android tries to load those files.

If you can reach the app list, go to Apps, then show system apps if needed. Open Settings, tap Storage, and choose Clear cache. Do the same for Google Play services, because it supports many Android system functions.

If your phone uses a different menu layout, the wording may vary a little. The goal is the same: clear temporary files, then restart the phone.

Clearing cache is safe on most Android phones and is usually the best first reset.

Force stop Settings, then try again

Force stopping closes the app completely and ends any frozen process tied to it. This is a safe step, and it often helps when Settings is stuck in a crash loop.

Find Settings in the app list, then tap Force stop. Wait a few seconds before opening it again. If the problem came from a process that never shut down properly, this can fix it right away.

Clear Settings app data if the crash keeps coming back

If cache clearing doesn't work, clear the Settings app data. This step is stronger because it wipes the app's stored setup and makes Android rebuild it.

On many phones, you can do this from the same Storage screen where you cleared cache. Afterward, some preferences may return to default. You might need to set a few options again, but your personal files, photos, and contacts should stay untouched.

If you're nervous, that's normal. Still, this step often fixes repeat crashes caused by broken internal files.

Use system-level fixes when the error does not go away

When the error survives the earlier fixes, the cause is often deeper than one bad cache file. At that point, test the phone in a stripped-down state, then check for Android updates. Save the reset options for last.

Boot into Safe Mode to check for a bad third-party app

Safe Mode starts Android without downloaded apps. That makes it one of the best ways to find out if another app is causing the crash.

The exact method differs by brand, but many phones let you press and hold the power button, then long-press Power off to enter Safe Mode. Once you're in, open Settings and use it for a minute.

If Settings works normally there, a third-party app is the likely cause. Restart the phone to leave Safe Mode, then uninstall recent apps one by one until the error stops.

Install the latest Android and security updates

Sometimes the fault is in Android itself. A system bug can cause Settings to crash after startup, after unlocking, or when opening menus like Network or Apps.

If Settings stays open long enough, check Software update and install anything pending. If it won't stay open, some brands let you update through a PC companion app or recovery tools.

Updates matter because phone makers often patch crash bugs in monthly fixes. After updating, reboot and test the phone again.

Reset app preferences or perform a factory reset as a last resort

Resetting app preferences is a smart step before wiping the phone. It can restore disabled system apps, reset permissions, and fix broken default app links without deleting your personal files.

You can usually find this option in the Apps menu. If that doesn't help, a factory reset is the final option. Back up your photos, contacts, messages, and files first, because this erase returns the phone to its original state.

If the error still shows up after a clean reset, the issue may be tied to the firmware or hardware. At that point, support from the device maker or your carrier makes sense.

Conclusion

The best path is simple: restart the phone, free up storage, and remove anything recently installed. If the error stays, clear cache, force stop Settings, and then clear app data if needed.

Most Android Settings crashes can be fixed without repair. If the phone won't stay stable, or the problem began right after a major update, manufacturer or carrier support is the next step.

How to Check Your Android Phone's Processor and Speed

How to Check Your Android Phone's Processor and Speed
 How to Check Your Android Phone's Processor and Speed

Your phone's processor affects more than benchmark scores. It shapes app speed, gaming performance, battery use, and how fast photos finish processing.

The problem is that Android doesn't always show hardware details in one obvious place. Some phones list the chip in Settings, while others only show a model number.

Start with the built-in menus, then use a trusted app if you want the full picture.

Find your processor model in your phone's settings

The fastest place to check is the Settings app. On many Android phones, open About phone and look for entries like "Model number," "Device name," "Hardware info," or "Phone details."

The exact path depends on the brand. Samsung often puts this under Settings > About phone. Pixels may show it under About phone or Device details. Motorola, OnePlus, and other brands use similar labels, but the wording can change.

A simple path usually looks like this:

  1. Open Settings.
  2. Tap About phone, About device, or System.
  3. Look for model number, hardware info, or device specifications.
  4. If you only see the phone name, open the detail pages inside that menu.

Look for the device model, then match it online

Many phones don't list the processor name at all. If that happens, use the full model number. Search that model with the word "processor" or "chipset," then check the phone maker's site first.

If the brand page doesn't show enough detail, use a reliable phone database or a well-known tech publication. This matters because some phones have different chips in different regions. A Galaxy or Xiaomi model sold in one country may not match the version sold somewhere else.

Check for software menus that show hardware details

Some brands add extra pages that go beyond the basic About phone screen. If you see options such as Hardware information, Device info, or My device, open them. You may find RAM, storage size, Android version, and sometimes the chipset name.

A few phones also have support or diagnostic pages, but they aren't standard across Android. If one menu looks thin, keep checking nearby sections. The phone may show hardware details in a different spot.

Use apps to see your processor, core count, and clock speed

If Settings comes up short, an app is the easiest way to get a full hardware snapshot. Popular choices on Google Play include CPU-Z, Device Info HW, and AIDA64. These apps can show your processor name, core count, GPU, Android version, memory, and live CPU speed.

After you install one, open the CPU tab, or sometimes a tab called SoC. That's where you'll usually see the chip name, such as Snapdragon, Tensor, Exynos, or MediaTek, along with the number of cores and their top speed.

What apps can tell you that Settings cannot

Apps fill in the gaps that Settings leaves out. They often show CPU architecture, core layout, maximum clock speed, current frequency, battery temperature, and sensor data. Some also list the GPU, which helps if you play games or edit video on your phone.

For most people, this is the best option. You get the details in one place, and you don't need to hunt through brand-specific menus.

How to read speed numbers without getting confused

CPU speed is usually shown in GHz. For example, 2.8 GHz means a core can reach 2.8 billion cycles per second under the right conditions. Many apps also show live speeds, which rise and fall as the phone works, idles, or gets warm.

A higher GHz number helps, but it doesn't tell the whole story.

A newer chip with better cores can beat an older chip with a higher clock. Software tuning matters too. Heat matters as well, because phones often lower speed on purpose when they get too hot.

Understand what your phone's speed really means in daily use

Specs are helpful, but daily performance is what you feel. A stronger processor usually helps with fast app launches, smoother scrolling, gaming, 4K video, and camera features like HDR or Night mode. It also helps when you switch between apps often.

Still, the chip is only one part of the picture. RAM affects how many apps stay open. Storage speed affects how fast apps load. Software updates matter too, because a well-tuned phone can feel smoother than a more powerful phone with heavy software.

When a fast processor still feels slow

Even a good processor can feel slow when the phone is under pressure. Low free storage is a common cause, because Android needs room for apps, downloads, and temporary files. Too many background apps can also eat memory and raise heat.

Old software, a worn battery, or overheating can make speed drop during games or video recording. If your phone lags, check storage first, restart it, update Android and your apps, and see if heat is part of the problem.

Simple ways to judge performance beyond the specs

Numbers matter, but a phone proves itself in daily use. Open a few apps you use every day and watch how quickly they load. Scroll through a long web page, switch between recent apps, and take several photos in a row. Those small checks tell you more than a single spec line.

A quick hands-on test can reveal a lot:

  • App launches should feel quick and consistent.
  • Scrolling and animations should stay smooth in common apps.
  • Games should hold steady performance without sudden heat spikes.
  • Multitasking should keep recent apps open instead of reloading them each time.

If those basics feel good, the processor is likely doing its job. If they feel rough, the issue may be the chip, but it may also be storage, RAM, heat, or software.

Conclusion

Finding your Android phone's processor is usually a two-step job. Check Settings first, then use a hardware info app if the chip name isn't there. That gives you the model, core count, and speed without much guesswork.

The most useful number isn't always GHz. Real-world performance matters more, because your phone's speed depends on the processor, storage, RAM, software, and heat working together. Once you know where to look, it's much easier to judge what your phone can handle.

Best Ways to Open RAR Files on Android

RAR
On Android devices, it is necessary to depend on third-party applications to access RAR files. Below are some of the most effective methods for opening RAR files on an Android smartphone.
1. Access RAR Files with the RAR application

We will utilize the RAR application developed by RARLAB to open RAR files.

1. Open RAR Files using the RAR app

We will use the RAR app from RARLAB to open RAR files.

1. Download and install the RAR app.

RAR

2. Open the application and grant the permissions. Now, locate the folder where the RAR file is stored.

3. Select the RAR file on the list. 

RAR-file-17

 4. Long-press on the RAR file and select Extract Here.

RAR-file-17


How To Find The Fastest DNS Server For Android

dns server

It is generally advisable to utilize the public DNS server on our devices. Public DNS servers, including Google DNS, OpenDNS, and others, provide improved speed and enhanced security features. Utilizing the fastest DNS server also leads to superior internet speed.
To identify the fastest DNS server for Android, one should employ an application called NetOptimizer. Below are the instructions for using the app.

1. Download & install the NetOptimizer app. 

NetOptimizer app.
2. Open the app and accept the Privacy & Policy.

NetOptimizer-
3. You will see a short tutorial on how to use the app. You can go through the tutorial or tap Skip tutorial.

NetOptimizer

 4. You will see the main screen of the app.

 
Scan DNS
5. Tap the DNS Scan button and then Scan DNS.

NetOptimizer-11


6. Wait for a few seconds until the app scans for the fastest DNS servers. 

NetOptimizer-13
7. A list of all DNS Servers will now be displayed. You should choose the one that offers low latency. The results are determined by your geographical location.

8. To configure the DNS, press the Use it button. You will be prompted to approve the connection request (VPN). Please grant the necessary permission.

NetOptimizer-6
Frequently Asked Questions:

Which DNS is the fastest for Android?

The fastest DNS for Android is the one that minimizes latency. To determine the quickest DNS server according to your location and network, it is advisable to utilize the NetOptimizer application.

Does private DNS improve Internet speed?

Although DNS does not have a direct correlation with internet speed, it can influence the speed at which webpages load on your device. Private DNS can enhance the loading times of your web pages, but it will not have an impact on your download speed.

How to use 1.1.1.1 DNS on Android?

The 1.1.1.1 is a complimentary, public DNS resolver provided by Cloudflare. It can enhance the speed and security of your searches. To configure the 1.1.1.1 DNS on Android, please refer to our guide – How to Set Up Private DNS on Android.

Does private DNS reduce ping?

DNS does not have a direct relationship with latency or ping. It solely affects the process of translating a domain name into an IP address. Therefore, DNS does not directly impact the ping rate.

Can Private DNS block ads?

Private DNS services, such as AdGuard, are capable of blocking advertisements from web pages. In addition to web pages, the DNS will also filter out ads from applications and games that you download.

This article provides guidance on how to identify the fastest DNS server for your Android smartphone based on your location and network. Should you require further assistance on this subject, please feel free to reach out in the comments.


Best free movies app and TV shows

movies app
I am an avid movie enthusiast. I take great pleasure in watching films and exploring new ones beyond my native language. One of the most effective methods for discovering new movies is through platforms like Instagram or TikTok. Numerous profiles share captivating movie scenes that immediately capture your attention and compel you to watch. However, a significant drawback is that you often only view that specific scene, and frequently, the profile fails to mention the title of the movie. Even the comments section typically lacks any indication of the film from which the scene originates.

In the past, I would spend time frantically typing highly specific scene descriptions into Google, hoping for a match, which seldom occurred. My curiosity led me to ponder whether there exists a music recognition application similar to Shazam, and if there is an equivalent app that could assist me with movies? My exploration led me to Voola, which transformed the way I discover films and television shows.

Voola is the magic sauce

It lets you discover movies from the clip you saw on Reels 

Voola
The application that most closely resembles Voola in its functionality is Shazam. When you encounter a captivating piece of music in a café or shopping mall, you simply launch the Shazam app, position it so that the speakers can capture the sound, wait a few moments, and voilà — Shazam accurately identifies the song that is playing.

This feature is incredibly convenient, as it eliminates the need to approach friends or the individual playing the music to find out which song has lodged itself in your mind. Voola operates in a similar manner, but instead of identifying songs, it recognizes movies and television shows.

The most impressive aspect is its ability to help you discover the actors featured in a film from just a brief clip. You open the app, provide it with a clip sourced from TikTok, Instagram Reels, YouTube Shorts, or X, and within seconds, Voola begins analyzing the video.
Once the analysis is complete, it provides the movie title, cast information, and any other details you may wish to know. While it may seem straightforward, it is a significant advantage for those who frequently watch films or wish to uncover titles that pique their interest.

It removes the necessity of asking or posting numerous comments merely to ascertain the name of a movie or television show. Often, the profile fails to respond to your inquiries, leaving you in uncertainty. With Voola, you can take control of the situation and allow your phone’s camera, along with the app, to handle the work for you.

 See at Google Play Store

Voola’s magic is straightforward

Voola offers three straightforward methods for submitting clips, all of which are incredibly easy to use. You can choose to record a video, upload one from your gallery, or paste a link directly from any social media platform.

If you are viewing content on your television or laptop, you can launch the app and press the record button. Voola will utilize your phone’s camera to capture a few seconds of whatever is displayed on the screen. If you have a clip saved in your phone’s gallery, you can upload it directly from there.

Finally, if someone shares a link to a Reel, TikTok video, YouTube Shorts, or a video on X, you can simply paste the link into Voola to retrieve the information. For testing purposes, I directed my phone’s camera at my laptop while watching an episode of a show I am currently enjoying — From on MGM+, which is arguably the finest horror series available at the moment. Within seconds, Voola provided the correct title, cast list, and all relevant details about the show.

The most impressive aspect of Voola was that neither the clip nor the angle I used was optimal for the content. I merely pressed record and allowed Voola to analyze what was displayed on my laptop. It delivers accurate information due to its identification engine, known as content fingerprinting.

Voola’s algorithm examines the visual and audio components from your screen and cross-references them with its extensive database. It encompasses everything from popular blockbusters to anime, indie films, and even television shows. While the accuracy may not be perfect, I have personally never encountered an error with this application. 


How to turned an old phone into an offline GPS

offline GPS

Here is a fact-based summary of the story contents:

I enjoy experimenting with the collection of old phones that I have on my gadget desk. Previously, I have transformed Android phones into a dedicated dashcam, a home security camera, and even a baby monitor to keep an eye on my 11-month-old, who is currently at a stage where she desires to explore everywhere. While there are specialized devices for these purposes, they do not offer the same processing power and user-friendliness as an Android device. Additionally, repurposing old smartphones is a cost-effective solution.

There are numerous ways to effectively utilize that old phone of yours, and it recently occurred to me that I could use it as an offline GPS for my car. This would allow my primary driver to relax and concentrate on other essential tasks, such as playing music or conserving battery life. If you also have a retired device at home, here is how to convert it into a dashboard companion. 

A dedicated device for navigation is always good

Put your primary driver to other use 

Utilizing your regular smartphone for navigation is indeed convenient. However, it entails several hidden costs that affect both your device and your overall driving experience.

Navigation is a task that demands significant resources. It necessitates continuous GPS signals, maximum screen brightness to reduce glare, and ongoing data retrieval. Even when utilizing Android Auto or Apple CarPlay, your smartphone remains actively involved in providing processing power, location services, and internet connectivity to the car's dashboard for navigation purposes.

This process not only hastens battery wear but also heightens the risk of OLED screen burn-in. By delegating this task to a secondary device (if available), you can extend the lifespan of the smartphone that you rely on for daily use. 

On top of this, setting up a secondary phone as the navigation device keeps your ride distraction-free. Since it won’t have an active SIM inside, you won’t receive text messages, email notifications, or app alerts. Your device remains locked on one task, that is, navigation, ensuring that you don’t miss a single turn. 

Setting up your old phone as a GPS

It all depends on the app that you are choosing 

The initial step in the procedure of converting your old phone into an offline GPS involves selecting the appropriate application. Although you can download offline regions using standard mapping applications such as Google Maps, these downloads eventually expire or necessitate a network connection for updates.

For a genuinely offline experience, it is essential to utilize an application specifically designed for this purpose. For this endeavor, I opted for the OsmAnd application. We have previously commended OsmAnd for its emphasis on privacy and its superior offline navigation capabilities compared to Google Maps. Thus, it was a clear choice for this task.

To provide some background, OsmAnd is an open-source navigation application that utilizes OpenStreetMap data. As an open-source application, it emphasizes functionality while safeguarding your privacy and minimizing data tracking.

All that is required is to download the map for your entire state, country, or continent while connected to your home Wi-Fi or cellular data. Once the download is complete, OsmAnd offers highly detailed, offline turn-by-turn navigation. It also features speed limit alerts, lane guidance, and specific points of interest along your route — all without the need for an active internet connection. 

Put things to work

It only takes a little effort 

Before anything else, it is advisable to configure your old phone to concentrate solely on one function, which is navigation. To achieve this, you must begin with a clean slate. This entails performing a factory reset on your device. This way, you eliminate any bloatware that may consume resources and remove any old accounts that could create clutter.

Here are the steps you need to follow:

 1   Access the Settings menu on your phone.
 2   Select General management.
 3   Scroll down and choose Reset.
 4   Proceed to the bottom and select Factory data reset.
 5   On the subsequent page, press the Reset button to entirely erase all your accounts, system and app data, settings, downloaded applications, music, pictures, and all other user data.

After your phone has been reset and it powers back on, you can skip the process of signing in to a Google account. It is unnecessary. You can sideload the OsmAnd APK from the OsmAnd website or transfer it from your PC. Once you have obtained the APK, follow these steps:

 1   Install the OsmAnd application on your phone and launch it.
 2   Upon your first launch of the app, it will prompt you to download the map. You may choose to do so or click the Skip Download button located in the bottom-right corner.
 3   You can proceed to download the specific region you plan to visit or the areas you frequent most. 

Once you are done, you do not need a Wi-Fi connection until you want to update the maps. 

Lock down your phone

It should be made for GPS-only use 

This is likely the most crucial step, and it should not be overlooked. Given that your old phone lacks a SIM card and is not being utilized for any other purpose, it is essential to maximize battery usage for navigation.

Access the Settings and perform the following actions:

1    Disable Wi-Fi auto-connect
2    Turn off Bluetooth
3    Adjust screen brightness manually to 40–50%, which is sufficient for visibility in daylight.
4    Deactivate auto-sync and background data
5    Turn off unused applications (including system applications)

By implementing these changes, you will immediately observe that your phone's battery life significantly improves when it is dedicated to a single function, which in this instance is GPS.

Once you have completed the aforementioned steps, the next task is to acquire an inexpensive phone mount for your vehicle's dashboard. Connect your phone to the car charger to ensure it remains charged, and you are all set.

You now possess a dedicated GPS device that incurs no additional costs and operates effectively in all locations, including underground parking, mountain passes, and areas where your primary phone may lose cellular reception. 

You are now almost prepared.

It would not be accurate to claim that OsmAnd is flawless, and that you will encounter no further issues. During my evaluation, I identified several aspects where it did not meet expectations. The first concern is the user interface. While OsmAnd does offer a functional UI, it does not align with contemporary standards. However, I would recommend adjusting the settings once and then leaving them as they are. Additionally, there is a lack of real-time traffic updates or information regarding nearby accidents. It also fails to dynamically update estimated time of arrivals based on current road conditions.

Nevertheless, when navigating through rural regions with unreliable reception or during a weekend getaway, this configuration serves as a dependable backup. An offline GPS device remains unmatched. You drive, you drive, and reach your destination with your primary phone comfortably situated, fully charged, and prepared for those extended doom-scrolling sessions. 

Universal remotes sound


Universal remotes sound
As you incorporate more streaming, gaming, and audio devices into your television setup, the number of remote controls you must manage will inevitably increase. Eventually, this can become overwhelming. Initially, your television screen comes with its own remote, and you may also possess a gaming console or streaming box, each with its respective remotes. When you introduce a Blu-ray player, turntable, or AV receiver, you have already doubled the number of remote controls in your configuration. If your home theater or listening station is particularly elaborate, the addition of a CD player or a Chromecast could further complicate the situation.

A potential solution might appear to be a universal remote — a single device designed to control everything in your media room. However, in 2026, discovering an effective universal remote solution is more challenging than it seems. Many previously leading universal remote brands, such as Logitech and Sony, have ceased the production of new models. This situation compels those seeking a new universal remote to invest in high-end options, like the Sofabaton X1S universal remote, or to settle for more affordable yet less functional alternatives, such as Best Buy's Insignia universal remote. Additionally, it is worth noting that the remote for your television or AV receiver can likely be programmed to manage some of the other devices in your setup, giving the impression that you already possess a universal remote.

 I tried turning my JBL MA710 receiver into a universal remote, and also turned my OnePlus 13 into a virtual universal remote for good measure. Both ways, I ended up wishing I had stuck with my handful of individual remotes. Sometimes, universal and simple aren't the same thing.

Universal remotes aren't always convenient

The time it takes to program and automate them could be better spent 

The most effective universal remotes are capable of supporting connections to multiple devices and various connection methods. Numerous media remotes utilize an IR blaster to interact with the devices they control remotely, while others rely on Bluetooth and Wi-Fi. It is likely that your TV or AV receiver's remote is designed to manage other devices using its IR blaster, typically through the HDMI CEC (Consumer Electronics Control) standard. This feature essentially enables your TV remote to effortlessly and automatically control devices linked to its HDMI port, requiring minimal or no manual configuration.

Depending on your configuration, the HDMI CEC functionality may fulfill your requirements for a "universal remote." For this feature to operate effectively, all devices within your setup must be compatible with HDMI CEC. If you need to manage non-HDMI inputs, a more robust solution will be necessary. A capable AV receiver could suffice — for instance, my JBL MA710 Dolby Atmos receiver is equipped with HDMI CEC and can also accommodate analog audio inputs, surround sound modes, and speaker management. However, it still lacks a crucial element that universal remotes require to be genuinely convenient: advanced programming capabilities. 

In other words, you desire a universal remote that can manage multiple devices simultaneously. For instance, I should be able to utilize a universal remote to establish a shortcut that activates my TV, Blu-ray player, and changes the receiver input with a single button press. I do not wish to toggle between different virtual remotes for each function, as that undermines the essence of a universal solution. The issue is that there are very few cost-effective universal remotes available that provide this degree of automation and programming capabilities.

It is likely that you are attempting to use your TV remote or AV receiver remote to control everything in your configuration, and these devices merely present a facade of convenience. When you attempt to turn off your streaming box to engage in video games and your TV screen simultaneously goes black, it can be quite frustrating. Numerous universal remote options lack the accuracy of using separate remotes, resulting in users spending more time troubleshooting than actually enjoying shows and movies, listening to music, or playing games. 

Android phones are better universal remotes

If you have a phone with an IR blaster, you already have a great remote 

A potential compromise between depending on your television or AV receiver remote and investing in an expensive universal remote may involve utilizing an Android phone. Certain Android models still feature integrated IR blasters, such as the flagship devices from OnePlus. I employed my OnePlus 13 as a universal remote using the Irplus application to manage every element of my configuration — including a five-disc CD changer from the 1990s — and the smartphone performed exceptionally well. You might discover an older Android phone from brands like Samsung, HTC, or LG in your storage that could still function as a universal remote in 2026.

Software-based universal remotes are superb for integrating all components of your setup, provided you possess a phone equipped with an IR blaster. Nevertheless, they share some of the same drawbacks as traditional universal remotes. Dedicated universal remotes frequently face criticism for having subpar physical buttons or poor ergonomics, and a virtual Android remote application will likely be inferior in these aspects. They are also not particularly suitable for sharing. Unless you have an extra Android phone, no one is inclined to circulate their phone during movie night. 


How turned expired credit cards into free NFC triggers


expired credit cards
Exploring methods to repurpose items within your household is consistently a beneficial practice. There is a rationale behind why individuals retain gadgets long after they have ceased to be functional. I am certain I am not alone in possessing an outdated phone that has remained unused for years, tucked away in a drawer, or a collection of cords and chargers that are incompatible with any of my current devices.

A similar observation can be made regarding your expired credit cards. Typically, when a credit card reaches its expiration date, it is advisable to cut it up and dispose of it. For many, it becomes redundant as it can no longer facilitate purchases. However, due to advancements in technology, your old expired credit card can be revitalized. All it requires is a bit of creativity to repurpose it within your smart home.

Your credit cards use NFC technology

It's one of the best ways to use a credit card 

NFC technology

You may have recently visited a store and used your credit card to make a payment by tapping it on the machine. This method is arguably the most prevalent way to pay in person nowadays. The necessity to swipe your card has largely disappeared in most retail locations, making this method of payment more convenient than even withdrawing cash from your wallet.

This convenience is attributed to Near Field Communication, commonly known as NFC. This technology facilitates the tap-to-pay functionality between your credit card and the payment terminal. A microchip embedded within the credit card emits a signal via a small antenna, transmitting your encrypted payment information to the terminal. You will notice a contactless symbol, which consists of curved lines that resemble waves being transmitted.

The payment terminal at the store or merchant captures the radio waves emitted by your card, processing your purchase and advancing the transaction. The same principle applies when you utilize a stored credit or debit card on your smartphone, tapping it on a terminal, utilizing services such as Apple Pay or Google Pay. This feature is available on most modern smartphones, including both Android and iPhone devices.

The entire process operates seamlessly due to the robust encryption of the transferred data. The act of tapping generates a unique tag that is exchanged between the devices. This tag is non-reusable, ensuring that your transaction is recorded with that specific identifier. 

Using NFC technology in other ways

Setting up smart home automations is a fun one 

Another application of NFC technology is the establishment of home automations within your residence. Utilizing an application such as the Shortcuts app on an iPhone allows you to configure automations for your smart home devices.

An NFC tag can act as a trigger for these smart home automations. Most of these automations follow an If/Then structure, indicating that when one event occurs, another will follow. This is the primary function of devices like motion sensors, which detect movement and subsequently initiate another action.

Similarly, tapping your phone on an NFC tag can activate another event. Whether you have smart plugs, lights, locks, or simply wish to enhance the functionality of an app on your phone, tapping an NFC tag can facilitate this.

Purchasing NFC tags is an effective method to establish various actions throughout your home. You can position different tags in various locations and assign each one a unique action.

A practical approach would be to place one near your bed to switch your phone to Do Not Disturb mode before sleeping. By tapping your phone on a light switch while ascending the stairs, you can illuminate the bedroom at the end of the hallway, thus avoiding the need to navigate the stairs in darkness.

There are countless ways to integrate your NFC tags, as these relatively inexpensive accessories offer limitless possibilities. However, if you prefer not to invest in them, your old credit cards can fulfill the same function. 

Set up your credit cards for home automations

ust a simple tap can get the same result 

Given that an NFC tag operates using the same technology as your phone when utilizing tap-to-pay, you can repurpose an old credit card as a tag for your smart home. I had an expired Visa card that I no longer needed. Therefore, I decided to repurpose it for automation.

During the setup of a New Automation in Shortcuts on an iPhone, you can choose NFC as the trigger for your action. The system will prompt you to Scan, indicating that you should tap your phone's reader (located at the top of your device) against an NFC tag. By tapping it on the credit card, the NFC technology is activated, establishing a connection between your phone and the credit card for the trigger.

I configured it to Run Immediately whenever my phone tapped this credit card. Subsequently, I programmed it so that a tap on the credit card would activate a smart light situated in the corner of my room. I positioned the credit card on my desk so that when my office began to dim due to the setting sun, I could tap my phone on that card, causing the lamp in the corner to illuminate. Since I do not have a smart speaker in my office, my options were either to manually turn the light on or to access the manufacturer's app to do so.

Tapping my phone on the credit card provides a significantly quicker method to brighten the room as it darkens. This approach is also preferable to using a smart plug with that lamp. 


How to Block Websites using Firewall

Block Websites
You can prevent access to distracting websites by establishing a straightforward firewall rule. Below, we provide a detailed guide on how to block websites using Windows Firewall.

1. Determine the IP Address of the Website

The initial step involves identifying the IP Addresses of the websites you wish to block. For instance, if you intend to block Facebook, you must locate its IP Address.

Finding a website’s IP Address is quite simple. To do this, you can utilize services such as IPVOID. Here are the steps you should follow.

1. Navigate to IPVOID using your web browser.

2. Input the website name in the designated text field and click on the Find Website IP button .
 
Block-website
3. The site will list the IP Address. You need to note down the IP address.

Block-website
2. Establishing a Firewall Rule to Restrict Access to Websites

After obtaining the IP Address, it is necessary to establish a Firewall rule to restrict access to websites.

1. Launch the Windows 11 search function and enter Windows Firewall. Select Windows Firewall from the displayed options .

 
Block-website
2. On the Windows Defender Firewall, click on the Advanced Settings.

Block Websites

 3. On the left pane, click on the Outbound Rules.

Block-website5


4. On the right pane, click on the New Rule button.

Block-website

5. On the Rule type pop-up, select Custom and click on Next.

Block-website-7

 6. Select all programs and click on the Next button on the next page.

7. Don’t make any changes to the Protocol and Ports option. Just click on Next.

Block Websites


8. On the Remote IP Addresses field, select the These IP Addresses checkbox.
 
Websites
9. Click on the Add button and add the IP Addresses you have copied. You need to enter every IP Address. Once you have done this, click on the Next button.

Block Websites

 10. On the Action page, select Block the Connection and click Next.

Block
11. On the Profile page, select all three options and click Next.

Block Websites


 12. Enter the name & description of the new rule and click on the Finish button.


If you try to access the blocked website, you will see a page like this .


 Alternative Methods for Blocking Websites on Windows 11?


If you are utilizing the Google Chrome web browser, there are various extensions available that can assist in blocking websites. Extensions such as Block Site and StayFocusd are particularly effective in preventing access to distracting websites .

As another option, you can modify the Hosts file on Windows 11 to restrict access to sites that you prefer to avoid.

For a comprehensive guide on how to block a website using the Hosts file, as well as instructions on utilizing website blocker extensions, please refer to this guide – Block a Website in Chrome.

Although the process may seem extensive, it is straightforward to execute. Should you have any questions regarding this matter, please feel free to reach out in the comment section below.

How To Read WhatsApp Message Without The Sender Knowing


WhatsApp

As we are all aware, when a message is sent to you on WhatsApp, the sender receives a notification or delivery report in return. Numerous users prefer not to disclose that they have viewed or read the message they received on WhatsApp. If you wish to read WhatsApp messages without the sender's knowledge, here are the steps you should follow.

1. Read the Message from the Notification Drawer


If you have enabled WhatsApp notifications, you can view messages directly from the notification drawer without launching the app. This method ensures that the sender remains unaware that you have read the message. However, please note that the notification panel only displays a limited number of characters from the WhatsApp message. If the message is lengthy, this approach may not be effective .

2. Using Flight Mode

To maintain your privacy, the next time you receive a message, activate Flight Mode or Airplane Mode on your smartphone before opening or reading the message on WhatsApp. Once Flight Mode is activated, you can access your unread message in WhatsApp and read it as many times as you wish without the sender being informed.

3. Disable the Read Receipts

WhatsApp provides the option to disable or enable read receipts. Turning off read receipts appears to be the most straightforward and authentic method to conceal your read status. However, the downside of disabling read receipts is that you will not be notified if someone has read your messages.

To disable Read Receipts, open WhatsApp and go to Settings > Privacy . Uncheck the read receipts option.

4. Use Third-party apps

Third-party apps like Beeper allow you to view disappearing messages more than once.
However, the older version of the app has the feature to read WhatsApp messages without giving away the read receipt.

Other than Beeper, you can use WhatsApp Mods to view WhatsApp messages without them knowing. But the use of WhatsApp Mods can lead to an account ban.
These are the only ways to read WhatsApp messages without them knowing. If you have any doubts, let us know in the comment box below. 


How to Track Product Warranties

How to Track Product Warranties


It is that season again to service the air conditioning unit and prepare for the impending heat of summer. Everything was proceeding smoothly until I discovered that the warranty on my air conditioner had lapsed two weeks prior, just before I intended to schedule a complimentary service provided by the manufacturer. We approached the brand representatives for the complimentary service, but our request was declined .

We possess another air conditioning unit that has two months remaining on its warranty. However, the primary challenge lies in keeping track of its warranty status. Furthermore, in many instances, neither the manufacturer nor the service provider notifies customers about the expiration of the warranty period. This oversight is particularly common with non-smart devices, such as large household appliances. Consequently, this can lead to unforeseen expenses and the forfeiture of benefits available during the warranty period.

Fortunately, there are numerous applications available that can assist in effectively monitoring your warranty. These applications allow users to set reminders for impending warranty expirations, store all warranty-related information securely, and export data when necessary .

Nevertheless, many of the warranty tracking applications I evaluated encountered various issues and did not fulfill my expectations. Several applications experienced errors during the registration process and became unresponsive after use. I was able to identify a few of the more reliable options, but they still presented minor challenges. As a result, I developed my own warranty tracking application, which surpasses most existing options.

In this post, I will guide you through creating your warranty tracker app, and I’ve also listed the three best apps if you want a quick solution.

Utilize To-Do List Applications for Setting Reminders

For a straightforward solution, a basic to-do list application can serve as an effective tool for reminding you about your warranty and managing your products. These applications typically feature reminder functions that allow you to set notifications for various events. In this context, they can be employed to alert you regarding the expiration of your warranty. However, a limitation of this approach is that you must manually input the expiration date to receive reminders.

On the positive side, to-do list applications equipped with reminder features are generally user-friendly, free of charge, and enable you to establish an unlimited number of warranty reminders. Furthermore, these applications often allow for customization of reminders according to your preferences, with many offering options for setting reminders at different intervals .

You may select any to-do list application that suits your needs. For illustration, I will reference the TickTick app, which is accessible on both Android and iPhone platforms.

Instructions for Using the To-Do App as a Warranty Tracker:

Step 1: Download and install the TickTick application (available for Android and iOS).  
Step 2: Launch the TickTick app and either sign in or create a new account.  
Step 3: Click the “+” button to initiate a new task.  
Step 4: Input the task name, such as “AC Warranty Expiry.”  

Set-warranty-reminders-using-To-do-list-app
Establish Warranty Reminders Utilizing a To-Do List Application

Step 5: Select the calendar icon to input a warranty due date and time.
Step 6: Proceed to designate the date and time for the warranty expiration notification.
Step 7: Click “Save” to record the task along with the reminder .
Step 8: Repeat this procedure for each item you wish to monitor.
Step 9: Review your task list to view all established reminders.

Complete Warranty Management Setup Using Notion


I hold a strong appreciation for Notion. In my previous app recommendations, I have frequently endorsed Notion due to its versatility in replacing various applications for enhanced functionality. Fortunately, Notion serves exceptionally well as a warranty tracking tool. I discovered free Notion templates specifically designed for warranty management, and I would like to acknowledge the creator, Denis Bondarev, for providing this template at no cost. Additionally, you have the option to develop your own Notion template. The Notion warranty tracker offers the following capabilities:

- Maintain a comprehensive database of all your warranties, encompassing purchase dates, warranty durations, product details, and more .
- Include extensive information for each product, such as serial numbers, model numbers, purchase locations, and warranty conditions.
- Receive notifications for impending warranty expirations.
- Backup and synchronize data across various devices.
- Export your warranty information to formats such as CSV and others.

How to Use Notion as a Warranty Tracker App

  • Step 1: Download the Notion app on your smartphone. (Android and iOS)
  • Step 2: Visit this link and purchase the Notion warranty template on Gumroad for free. You can also duplicate the template by clicking on this link.
  •  
    How-to-get-free-Notion-Warranty-Tracker-template
    Step 3: Click on the Get template, enter the fair price tap on I want this enter your email, and click on Get.

    Using-warranty-tracker-template-in-notion
    Step 4: An email containing the download link for the template will be sent to you. Please open the email and select the option to View template.  
    Step 5: Next, click on the link for the Warranty Tracker for Notion.  
    Step 6: This action will open the template. Subsequently, click on the Built with Notion option located at the top right corner.  
    Step 7: You will then need to log in to your Notion account via the web. The template will be integrated into your Notion application.  
    Step 8: Finally, access the template within your Notion app and click on the plus sign to add the warranty for a new device.
  • how-to-add-device-warranty-to-notion
    Top Warranty Tracker Applications for Android and iPhone

    Developing a Notion tracker may be daunting for certain individuals. Given the constraints associated with utilizing a to-do list application as a warranty tracker, I have identified three superior applications after evaluating numerous alternatives.

    Home Contents (iOS)

    Highlights:

        Price: Free, with a $5.99 option to unlock all features.
        Warranty Entries: 25 entries available for free, unlimited entries with purchase.
        Receipt and Barcode Scanning: Supports photos and PDF receipts, as well as barcode scanning.
        Notifications and Reminders: Not available.
        Export Data: Allows for the creation of PDF reports.
        Backup Data: Enables backup creation and synchronization with iCloud .

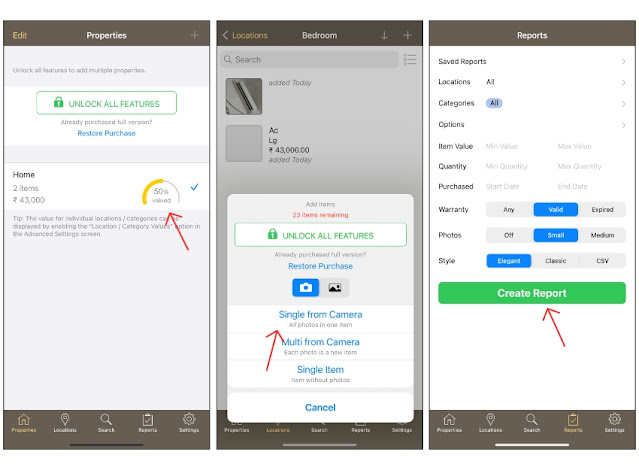
    Home Contents stands out as the most effective application among those I have evaluated. Firstly, there are no complications encountered during the creation or usage of the app. Secondly, the user experience is commendable, surpassing that of many other applications. Additionally, it includes a variety of useful features.

    This application can be utilized to monitor the warranty status of various products, allowing for the tracking of warranties for up to 25 products in the free version. Users can also add devices to the app.

    The app provides multiple methods to facilitate the entry of product information, including the ability to upload receipts and utilize a barcode scanner. However, a significant drawback is the absence of notification support, necessitating users to manually open the app to verify warranty periods.

    Download

    Warranty keeper (Android, iOS)

    Price: Complimentary.  
    Warranty Entries: Unlimited submissions.  
    Receipt and Barcode Scanning: Upload proof of purchase via photographs.  
    Notifications and Reminders: Yes, receive push notifications for warranty expirations.  
    Export Data: Send data to your email.  
    Backup Data: Retains all your information and links to your account.

    After evaluating various Android warranty applications, I have determined that Warranty Keeper is the most effective choice for Android users. The rationale is straightforward: it operates smoothly without any bugs. The application is user-friendly, even more so than the Home Contents app available for iOS .

    Users can input their devices and monitor warranty information categorized accordingly. Additionally, it allows for the inclusion of purchase details, warranty duration, item images, and any relevant notes, all of which can be saved within the app.

    Furthermore, users can configure notifications to alert them as the warranty period approaches its conclusion. This app enables the management of warranty information for all devices in one centralized location. It is also free of charge, permitting unlimited entries without advertisements or intrusive push notifications.

     Download