Showing posts with label Iphone tips. Show all posts

How to fix iPhone Stuck on Verifying Update

iPhone Stuck on Verifying Update


 Apple frequently issues iOS updates to offer users appealing features and rectify existing bugs. Nevertheless, an issue arises when the iPhone becomes unresponsive on the ‘Verifying Update’ prompt. If you have recently acquired a new iPhone and it is halted on this prompt, here are some steps you can take.
Why is my iPhone Stuck on the ‘Verifying Update’ screen?

The ‘Verifying Update’ screen is displayed after you download the update, as your iPhone attempts to verify the files that have been downloaded. This step is essential prior to the installation of an update to guarantee a seamless process.

Typically, the ‘Verifying Update’ procedure should only take a few seconds or minutes to finish; however, if it is taking an extended period, your iPhone may be stuck in this process. There are various reasons why this might occur, including issues with the Apple Server, software bugs, glitches, an unstable internet connection, or inadequate storage space.

Now that you know why your iPhone is stuck on the ‘Verifying Update’ screen, it’s time to troubleshoot it.

1. Check Apple’s System Status

iPhone-1-3
Similar to other web services, Apple’s official servers frequently undergo maintenance; during these periods, iOS updates may face issues during the verification or installation process.

Please visit this webpage to review the System Status for iOS services. If any critical services are unavailable, you will need to be patient.


2. Hard Restart iPhone

If you are unable to proceed beyond the 'Verifying Update' screen on your iPhone, there is no need to worry. Performing a hard reset on the iPhone may serve as an effective remedy. A hard reset is advisable if you find yourself stuck on the Verifying update screen on your iPhone.

1. Press and quickly release the Volume Up button on your iPhone.

2. Press and quickly release the Volume Down button on your iPhone.

3. Press and hold the Side/Power button until the Apple Logo is displayed.

This process will initiate a hard restart of your iPhone. Following the restart, the 'Verifying Update' screen will no longer be visible. 

3. Delete the iOS Update

Once you get past the ‘Verifying Update’ screen, you must delete the iOS update first.

1. Launch the Settings app.

Telegram-Not-Downloading-18
2. Tap General.

iPhone-11
3. Tap iPhone Storage.

iPhone-3-3

4. Find the iOS update in the list.

5. Select the iOS update and tap Delete Update. (Not all iOS versions will have this option).

 These are a few simple methods to fix iPhones stuck on ‘Verifying Update’ and won’t turn off the screen. Let us know if you need more help in fixing iPhone update problems.


iPhone Call Forwarding How to Turn On

iPhone Forwarding

 Before you access the iPhone Settings to activate the Call Forwarding feature, it is important to keep a few key points in mind.
You can utilize the call forwarding feature only if it is supported by your network provider.
Ensure that the number you wish to receive calls on is currently active. Additionally, avoid forwarding calls to a number that is turned off.
In addition to call forwarding, you have the option to set up voicemail on your iPhone.
If you intend to travel abroad, verify the costs associated with forwarded calls. Certain network providers may impose charges for these forwarded calls.

How to Forward Calls on iPhone

Having understood the Call Forwarding feature and its advantages, here are the steps to utilize this function.

1. Access the iPhone Settings.

iPhone Forwarding

 
2. Tap Phone

Call-Forwarding-5


3. Scroll down to the Calls section.

4. Tap Call Forwarding.


WiFi-Calling-3
5. Enable the toggle for Call forwarding.

Call-Forwarding-3


6. Tap the Forward To option.

7. Type the phone number to which you would like to direct your iPhone calls.

Call-Forwarding

 8. Once you have entered the phone number, press the Back Button located in the top left corner. This action will automatically save the modifications.

9. To verify if Call Forwarding is enabled, access the Control Center on an iPhone and look for a phone icon accompanied by a right arrow in the Status Bar.

Call-Forwarding-1

 Call forwarding is enabled on your iPhone when you observe the phone icon accompanied by a right arrow.

The Call Forwarding feature is highly beneficial as it enhances productivity by ensuring that more calls are received. It is advisable to utilize this feature while traveling to prevent incurring roaming charges.

How to Fix the "Liquid Detected Alert on Your iPhone

Liquid Detected in USB-C
If you are trying to charge your iPhone and receive an alert indicating that liquid has been detected in the connector, it is important to follow the troubleshooting steps to address the "Liquid Detected" alert and restore normal charging functionality to your iPhone.

1. Dry the USB-C or Lightning Port

Even if you are currently holding a dry iPhone, it is prudent to assume that the "Liquid Detected" alert is correct. It is essential to remember that while iPhones possess water resistance, they are not entirely waterproof. Furthermore, not all iPhone models feature water resistance.

Consequently, if your iPhone has recently been submerged in water or you have taken it swimming, it is highly likely that water has entered the charging port. The appropriate course of action is to dry the charging port of your device.

In the future, if you wish to take your iPhone to a pool or engage in water sports, you might consider investing in a waterproof iPhone case that fully encases your device. Otherwise, it is advisable not to shower or swim with your iPhone, as cautioned by Apple.

Conversely, if you are confident that your iPhone has not been exposed to water for several weeks, the "Liquid Detected" alert may merely be a malfunction. In such a scenario, let us proceed to explore additional solutions.

2. Troubleshoot the Charging Cable
Charging Cable
The next step is to remove and reinsert the Lightning or USB-C cable into the charging port because the accessory may not have been recognized correctly.

If the previous solution fails, consider using an alternative Lightning or USB-C cable. If the notification appears solely when utilizing a specific cable, it indicates that the problem lies with the cable rather than your iPhone.

Numerous inexpensive, counterfeit Apple cables are available in the market. It is advisable to acquire official or MFi-certified accessories to avoid compatibility issues and potential damage to your iPhone.

3. Clean Your iPhone's Charging Port

If there is debris lodged in your iPhone's Lightning or USB-C port, it could also lead to charging complications. You may utilize the SIM-eject tool to carefully clean your iPhone's charging port and determine if this resolves the "Liquid Detected" notification.

Avoid spraying cleaning solutions directly onto your device or employing compressed air while cleaning your iPhone.

4. Restart Your iPhone

The subsequent troubleshooting measure is to perform a soft reset on your iPhone, commonly referred to as a force restart. Restarting is a reliable remedy for nearly all minor technical issues across any device, making it a worthwhile attempt to eliminate the "Liquid Detected" alert.

5. Update Your iPhone

Finally, it is advisable to update your iPhone to the most recent iOS version if you have not done so already. iOS updates include bug fixes and performance enhancements, which may assist in preventing unnecessary alerts like this one from appearing.

Navigate to Settings > General > Software Update on your iPhone to verify if an iOS update is available.
Should You Use Emergency Override to Charge Your iPhone? 

Emergency Override

 The "Liquid Detected" notification may offer an Emergency Override feature to charge your iPhone, but is it advisable to proceed with this? 

If you know that your iPhone remains wet, you should refrain from using a wired charger, as this could cause irreversible damage to your device. A more secure option is to charge your iPhone wirelessly, ensuring that the back of your iPhone is dry beforehand. 

Keep in mind that the "Liquid Detected in USB-C (or Lightning) Connector" alert serves to protect your device from lasting damage and to safeguard your well-being. It poses a significant risk if an iPhone continues to charge while the Lightning port is wet. 

However, this alert may occasionally appear even when your iPhone is not wet. By adhering to the aforementioned steps, you should be able to quickly rectify the issue and resume charging your iPhone. If the issue continues, it is advisable to reach out to Apple Support to determine if there are additional problems with your device.

How to Bypass iPhone Verification When Installing Free Apps

iPhone Verification
Experiencing the "Verification Required" notification each time you attempt to download an application from the App Store can be quite irritating, particularly when the app is free. Below are the steps to eliminate those bothersome verification notifications on your iPhone.

 1. Add or Update Your Apple ID Payment Method

Outdated or expired payment methods linked to your Apple ID may cause the "Verification Required" alert to appear. This issue can also arise if you have not included any payment methods in your Apple ID.

Thus, updating or adding your payment method details is an effective first step. Please follow these instructions:

  1  Launch the Settings application on your iPhone and select your Apple ID name located at the top.
  2  Navigate to Payment & Shipping and then select your existing payment method. If you have not configured any payment methods, click on Add Payment Method.
 3   Confirm your card number, expiration date, and billing information. Utilize the Edit option in the upper-right corner to modify any necessary details.
  4   Choose Remove Payment Method if the current payment method is no longer valid. Afterward, return to the previous menu to add a new payment method.


Remove Payment Method
After you have added or updated your payment method, proceed to the App Store and attempt to download an app to your iPhone once more.

2. Verify for Any Failed or Pending App Store Purchases


In the event that you have outstanding payments, possibly due to a subscription or in-app purchases, you might see the "Verification Required" message when trying to install free applications. To resolve this issue, it is necessary to check for any failed or pending App Store purchases and finalize them. Here is the procedure to follow:

  1  Launch the Settings application on your iPhone and select your Apple ID name located at the top.
  2  Navigate to Media & Purchases and choose View Account from the menu that appears.
  3  Tap on Purchase History, search for any unpaid or failed transactions, and complete them.

Apple ID payment method

 Have problems with your Apple ID payment method? Learn what to do if Apple keeps declining your payment method.


3. Sign Out of Apple ID and Sign Back In

In most cases, completing pending Apple ID purchases or updating the payment method should stop the verification prompts when installing apps on your iPhone. However, if the issue persists, you can try signing out of your Apple ID and signing back in. This should help fix any potential glitches and stop the persistent verification prompts .

To sign out of your Apple ID on your iPhone, follow these steps:

  1. Open the Settings app on your iPhone and tap your Apple ID name at the top.
  2. Scroll down and tap Sign Out at the bottom. Enter your Apple ID passcode and tap Turn Off.
  3. Enable all the toggles to keep a copy of your iCloud data before you log out.
  4. Tap Sign Out in the top-right corner, then tap Sign Out again when prompted. 
  5. apple-id-in-iphone-settings-app-1
    To begin, restart your iPhone, then reopen the Settings application and select Sign in to your iPhone. Enter your Apple ID credentials, and subsequently attempt to download an application from the App Store.

    One or more of the aforementioned suggestions should eliminate the "Verification Required" notifications you encounter when installing free applications on your iPhone. Nevertheless, if these solutions prove ineffective, you may want to utilize the Apple Support app for professional assistance. An Apple support representative should be capable of guiding you through troubleshooting procedures tailored to your particular circumstances.

How to Backup iPhone Without iCloud


Backup Your iPhone

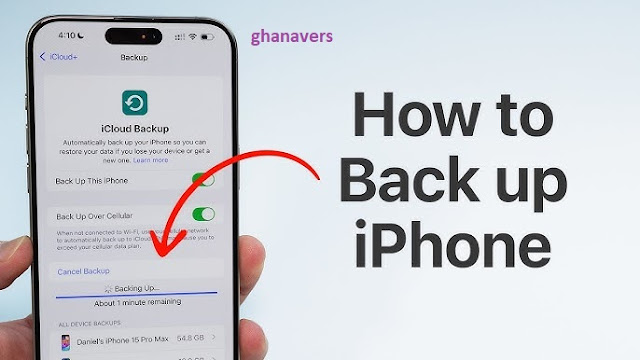
iCloud provides a convenient method for backing up data on your iPhone. Apple allocates 5 GB of complimentary iCloud storage, which can be quickly consumed when backing up photos, videos, and application data. Depending on the volume of your backup, it may be necessary to upgrade your iCloud storage, which will result in a monthly charge based on the selected storage capacity.

If you are seeking a free or cost-effective alternative to back up your iPhone without utilizing iCloud, this guide will assist you. You will discover how to back up your iPhone using free tools available on both Mac and Windows, as well as third-party applications, and by manually downloading data from your iPhone .

Methods for Backing Up Your iPhone Without iCloud


You can utilize the Finder application on a Mac or the Apple Devices app or iTunes on Windows to back up your iPhone without relying on iCloud. Additionally, numerous third-party software options are available that offer enhanced features, including selective backups and wireless backup capabilities. Furthermore, you can manually back up specific data types, such as contacts, photos, and documents, and store them locally on your iPhone.

1 .Backing up your iPhone using a Mac . 

The Finder application on macOS provides a built-in backup tool that allows you to create a comprehensive copy of your iPhone's data, encompassing applications, music, photos, videos, contacts, and more. Through Finder, you can easily view and manage your backup files, remove outdated backups, and transfer backups to external storage to optimize space on your Mac. Additionally, you can manage backups that were previously created with iTunes and set up automatic backups whenever your iPhone is connected to your Mac.

Instructions for backing up your iPhone via the Finder application on Mac:

Step 1: Connect your iPhone to your Mac using a USB cable. Upon the initial connection, grant your Mac permission to access the files on your iPhone and trust the Mac on your iPhone to enable data access. Follow the on-screen instructions to complete this process.  
Step 2: After establishing the connection, launch the Finder app and select your iPhone from the ‘Locations’ section.

iphone-in-the-finder-location
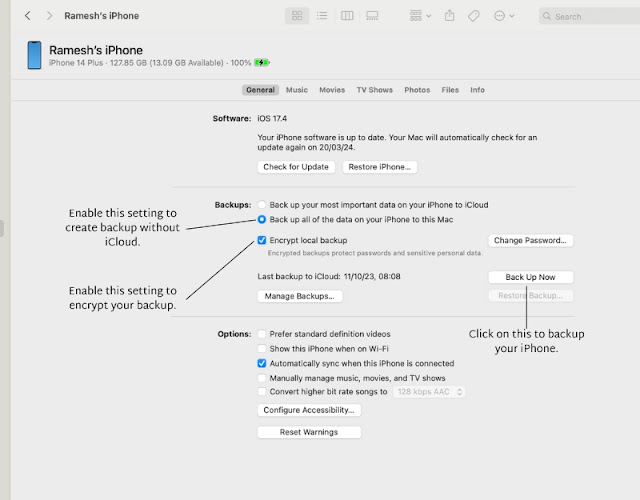
Step 3: In the ‘General‘ tab, go to the ‘Backups‘ section.
Backup-section-in-the-finder-tool

Step 4: Opt to back up all data from your iPhone to your Mac by selecting the option ‘Back up all of the data on your iPhone to this Mac.’ Additionally, you have the option to encrypt your backup. Enabling encryption ensures that all your passwords and sensitive information are included in the backup. It is crucial to remember the password you create for this purpose, as forgetting it will prevent you from accessing the backup. If you decide against encryption, please note that sensitive information such as passwords will not be included in the backup.

Step 5: Click on ‘Back Up Now.’ If prompted, please enter the password on your iPhone. The duration of the backup process may vary based on the size of the backup file.

backup-iphone-data

Step 6: You will receive a notification upon the successful completion of the backup process. To view your backups, select ‘Manage Backups.’ Please note that the new backup file will overwrite the previous one. If you wish to retain an older backup file, right-click on it and select ‘Archive.’ This action will safeguard the current backup from being replaced by subsequent backups.

Step 7: In the event that your Mac is low on storage, you have the option to transfer the backups to an external drive:

1. Connect an external drive to your Mac.
2. On your Mac, navigate to ~/Library/Application Support/MobileSync/Backup, where all backup files are located.
3. Copy the backup folders from your computer to the external drive.
4. After copying, you may delete the backups from your computer to reclaim disk space.

Step 8: To restore a backup, select the Restore backup option, choose the desired backup files, and proceed with the restoration. Ensure that your iPhone is connected to your Mac during the restoration process.
 

2.Windows: iTunes or Apple Device App

  The Apple Devices application is compatible with Windows 10 and subsequent versions. For users with earlier versions of Windows, iTunes serves as an alternative. Both options necessitate connecting your iPhone to your PC. Through these methods, you can create multiple backups, access backup data, encrypt the backup information, remove outdated backups, and transfer data to external devices to free up space on your device.

Instructions for backing up your iPhone using the Apple Devices app:

1. Download and install the Apple Devices app from the Microsoft Store, where it is available at no cost.
2. Launch the application, accept the terms and conditions, and click on Start.
3. Connect your iPhone to your PC, follow the on-screen prompts, and establish trust with the device. You will need to input your iPhone password to complete this process.
4. Click on the General tab.
5. In the backup section, select "Back up all of the data on your iPhone to this Mac," and then click on Backup Now.
6. The duration of the backup process will vary based on the size of the data, and you can monitor the progress in the status bar at the bottom of the screen.
7. Once the backup is complete, you have the option to restore the backup or manage it by clicking on the Manage Backups button in the backup section.
8. To restore a backup, click on Manage Backups and choose the specific backup you wish to restore.

 To create a backup of your iPhone using the iTunes application on a Windows computer, please follow these steps:

Step 1: Install iTunes from the Microsoft Store on your computer, or access it via the provided link.  
Step 2: Launch iTunes and sign in with the Apple ID associated with your iPhone.  
Step 3: Connect your iPhone to the computer using a USB cable. If this is your first connection, your iPhone will prompt you to trust the computer. Select “Trust” and enter your passcode if required.  
Step 4: Navigate to the General tab and locate the backup section.  
Step 5: You will be presented with two backup options. Choose ‘Back up all of the data on your iPhone to this Mac‘ and then click ‘Back Up Now‘.  
(Optional) To encrypt your backup, select the “Encrypt” option and create a password. Ensure that you remember this password.  
Step 6: To locate your backup on your PC, follow the path: This PC > C: Drive > Users > [Your Username] > Apple > MobileSync > Backup.  
Step 7: If you wish to remove any backups, open iTunes and select “Edit” > “Preferences” > “Devices.” Here, you will find a list of your backups. Choose the backup you wish to delete and click “Delete Backup.”  
Step 8: To restore a backup to your iPhone, connect it to your computer with the USB cable, access your iPhone’s page in iTunes, click “Restore Backup,” select the desired backup, and then click “Restore Backup” once more .


3.Using Third-Party Software (Windows and Mac)

Third-party software presents an excellent option for those seeking a thorough backup solution for their iPhone. After evaluating various tools, we identified AnyTrans by iMobile and iMazing as two dependable options for iPhone backup.

Both applications facilitate the straightforward creation and management of backups on your PC. They allow for the backup and restoration of specific data on your iPhone, support wireless backup capabilities, ensure secure and private backups, and offer data encryption to safeguard your information. Regarding data protection, both tools store backups locally on your device and support AES-256 encryption for iTunes backups.

I. iMazing 2

I. iMazing 2

 iMazing 2 serves as a comprehensive management solution for iPhone users, enabling the creation of local backups of iPhone data directly on a PC. This tool facilitates the transfer of various types of data, including messages, music, photos, and more, from iOS devices to computers. It supports wireless backup functionality and automatically generates backups when both the iPhone and Mac are connected to the same Wi-Fi network .

Available for both Mac and Windows platforms, iMazing offers a free version alongside a paid option. The free version permits the creation of unlimited backups; however, restoring these backups requires the paid version. Users can also selectively back up specific files, such as photos, messages, and contacts. All backups are stored locally on the Mac and can be easily transferred to external storage devices.

II. AnyTrans from iMobile
AnyTrans serves as a highly effective solution for backing up data from iPhones. It enables users to generate a comprehensive backup of their devices while accommodating a variety of content types, such as images, videos, music, call logs, and Safari browsing history. The application facilitates wireless backups and allows for the scheduling of regular backup intervals. AnyTrans automatically initiates a backup when both the iPhone and the PC are connected to the same network, and it offers management options for backups, including viewing, deleting, or transferring them to external storage .

The software supports incremental backups, which focus on saving only the new or modified data since the last backup, thereby optimizing both time and storage space. Users also have the option to selectively restore specific files from a backup. Beyond its backup capabilities, AnyTrans includes additional features such as the creation of custom ringtones, management of iCloud files, transfer of WhatsApp data, and functionalities for screen mirroring and recording...
 

How to View and Unblock Blocked Numbers on iPhone

Blocked Numbers on iPhone


It is advisable to block numbers on your iPhone if you are frequently receiving spam calls. However, there may be instances where you inadvertently block the wrong individual, necessitating the unblocking process to resume receiving their calls and messages. The following instructions will guide you through this procedure.

How to Access and Unblock Blocked Numbers on iPhone

When you block a contact on your iPhone, that individual is unable to call, text, or FaceTime you. Your device directs calls from blocked contacts straight to voicemail without alerting you to any missed communications.

The blocked list on your iPhone applies to phone calls, text messages, iMessage, and FaceTime alike. To unblock a contact, you simply need to remove their number or contact details from this list. The steps to do so are as follows:

1. Open the Settings application on your iPhone.
2. Navigate to Apps > Phone > Blocked Contacts to see all contacts you have blocked.
3. Swipe left on the contact you wish to unblock.
4. Tap Unblock to remove that individual from your Blocked list.

 How to Stop Your iPhone from Silencing Unknown Callers

Are you still experiencing missed calls or messages despite having an empty "Blocked Contacts" list? This issue may arise if the "Silence Unknown Callers" feature is activated on your iPhone. When this feature is turned on, your iPhone automatically mutes calls from individuals not saved in your contacts.

To disable the silencing of unknown callers on your iPhone:

1. Launch the Settings application on your iPhone.
2. Navigate to Apps > Phone.
3. Scroll down and select the Silence Unknown Callers option.
4. Disable the Silence Unknown Callers toggle.

phone-app-settings-menu-on-iphone

 Similarly, you can unblock messages from unknown senders on your iPhone. To do so, go to Settings > Apps > Messages > Unknown & Spam and turn off the Filter Unknown Senders option.

silence-unkown-callers-option-in-iphnoe-settings

  To mitigate concerns regarding spam calls, consider installing an application such as TrueCaller, which assists in identifying unknown callers and alerts you to calls that may be worth answering.

If you wish to unblock a particular contact or all unknown callers on your iPhone, the procedure is relatively simple. Furthermore, there are methods available to determine if your phone number has been blocked by someone if you find yourself unable to contact them.

7 Best Document Scanner Apps for iPhone

scan-documents-iphone-without-app

A document scanner application enables users to effortlessly scan, edit, and save documents in a digital format without the necessity of a physical scanner. Some applications provide advanced functionalities such as Optical Character Recognition (OCR), which facilitates the extraction of text from scanned documents, as well as the ability to edit, annotate, secure documents with passwords, and convert them into various formats .

Nevertheless, selecting a suitable document scanner can be challenging due to the vast array of available options. It is possible to select an application that is overly complicated for your fundamental requirements or one that is plagued by frequent advertisements, resulting in user dissatisfaction. After evaluating numerous options, here are the eleven most effective document scanner applications for the iPhone.

1 Genius Scanner

Genius Scanner
Genius Scanner stands out as my preferred choice among the numerous applications I have evaluated. This preference is based on two main factors. Firstly, it outperforms all other applications on this list in terms of speed, and secondly, it is user-friendly. If you require a scanner app that is both quick and efficient, Genius Scanner is likely your optimal choice.

The application swiftly captures documents, converts them into PDF format, and allows for immediate sharing with others. It also provides a range of editing tools, including curvature correction and additional features .

Once editing is complete, users can share documents instantly and utilize e-signing capabilities. However, it is important to note that a separate application is necessary for e-signing and adding signatures to documents. Users can capture, import, or add images from their gallery, and the app supports batch processing as well. Notably, I have not encountered any advertisements, which is commendable given the app's extensive offerings.

Advantages:

1. Superior speed compared to other applications.
2. Ad-free experience, even in the free version.
3. Smooth and user-friendly batch processing.

Disadvantages:

1. More basic in functionality compared to some other applications.
2. A separate application is required for e-signing documents.

Reasons to Select Genius Scanner: It is the fastest document scanner app equipped with all the essential features.

 Download Genius Scan

2 Adobe Scan

Adobe Scan
Adobe, renowned for its extensive array of software solutions, also offers a specialized scanning application known as Adobe Scan. For individuals who frequently handle PDFs and convert scanned documents into this format, Adobe Scan presents a compelling option. The application is distinguished by its unparalleled quality in generating PDF files, surpassing that of other applications on the market, including Scanner Pro. Additionally, it boasts sophisticated image processing features that automatically rectify distortions, such as shadows and perspective issues.

Moreover, Adobe Scan includes Optical Character Recognition (OCR) capabilities, allowing users to extract text from documents at no cost, a feature that is often restricted to premium tiers in other applications. A notable benefit of Adobe Scan, akin to Microsoft Lens, is its lack of watermarks on documents produced through the app. However, it is important to note that Adobe Scan has certain limitations; specifically, editing PDF files necessitates a subscription to Adobe Premium.

Upon creating an Adobe account, users are granted 20GB of complimentary cloud storage, which facilitates the storage and future retrieval of documents. If your primary objective is to utilize a scanner for converting documents into PDFs and editing them conveniently, Adobe Scan may be the ideal solution for you.

Advantages:

- Produces high-quality PDFs.
- Free OCR functionality without watermarks.
- Seamless integration with other Adobe applications.

Disadvantages:

- PDF editing requires a premium subscription.
- Many advanced features are only accessible through a subscription.

Reasons to Choose Adobe Scan: The premier PDF scanning tool.
 
Download Adobe Scan

3 Microsoft Lens

Microsoft Lens
For those seeking a free and straightforward document scanning application, Microsoft Lens is readily available for installation from the app store. There are numerous reasons that contribute to Microsoft Lens being regarded as a top choice. Firstly, in contrast to many other document scanner applications, it is devoid of advertisements and does not offer paid versions that restrict the functionalities of the free version. Its user-friendly interface enables users to scan documents, identification cards, and handwritten notes directly using the camera, a task that many individuals perform on a daily basis.

The optical character recognition (OCR) feature is also provided at no cost and is effective in identifying and extracting text from documents. Furthermore, for those who utilize Microsoft products, documents can be exported directly to applications such as Word, Excel, PDF, PowerPoint, and others.

These attributes render Microsoft Lens an excellent application for routine use. However, it may fall short for users seeking professional features, such as the ability to incorporate signatures, watermarks, or other advanced editing capabilities.

Advantages:

- Completely free and free from advertisements.
- Seamless integration with Microsoft Office applications like Word and Excel.
- The OCR functionality is robust and incurs no additional charges.

Disadvantages:

- Lacks certain advanced features, such as the ability to add signatures or watermarks.
- While suitable for basic scanning, it may not fulfill all professional requirements.

Reasons to Select Microsoft Lens: Ideal for everyday scanning needs with smooth integration into Microsoft Office applications.
 
Download Microsoft Lens

4  DocuScan

DocuScan


DocuSnap is a comprehensive scanning application designed for the iPhone. A notable aspect of the app is its user interface. While it does not feature a contemporary or elaborate design, it maintains a clean aesthetic throughout, and the free version is devoid of advertisements.

The application enables users to scan both documents and identification cards. Users can capture images using the camera or import them from the photo gallery or the Files app. After scanning, a variety of editing options are available, including essential functions such as cropping, rotating, and rearranging. Furthermore, users can enhance their documents by adding text, signatures, color filters, and highlights.

Additionally, DocuSnap includes a text extraction tool that allows users to copy text from images or translate it into different languages, which proves particularly useful when dealing with menus or other printed materials. Other functionalities encompass merging PDFs, extracting content from PDFs, compressing files, converting text to PDF format, and reading PDFs, among others. These features make DocuSnap an excellent choice for individuals seeking efficient document editing capabilities.

Advantages:

- Provides a clean, advertisement-free interface in the free version.
- Equipped with a variety of editing tools, including text extraction and PDF management.
- Ideal for document editing tasks.

Disadvantages:

- No significant drawbacks.

Reasons to Select DocuSnap: It offers a wide range of document editing features at no cost.

 Download DocuScan


5 Cam Scanner

Rich Document Scanner App
CamScanner stands out as an excellent choice for those seeking a batch scanning and watermarking application. It offers a wide array of features that facilitate the scanning and editing of documents. Users can modify text, apply various filters, and rearrange pages, in addition to benefiting from its batch scanning capabilities. Furthermore, CamScanner enables users to sign documents and create personalized watermarks.

The free version, however, is restricted to basic functionalities. Features such as watermark creation and OCR support are exclusive to the premium version. Additionally, the free version is accompanied by advertisements that can be intrusive during usage. The app includes an auto-capture feature, which proves useful in specific scenarios. While the document quality could be improved, it is still superior to that of the Scanner Pro app .

CamScanner also features a dedicated tools section that provides numerous options for converting documents into different formats. Users can generate QR codes for any link and utilize a print function that allows for direct printing of documents created within the app. Notably, the free version does not impose watermarks on the documents.

In summary, CamScanner is an ideal choice for those in search of a comprehensive, free document scanning application that enables the creation and saving of documents without watermarks. Although the free version has limitations, it remains free of watermarks. The primary drawback of the app is the presence of ads that appear with each action taken within the application.

Pros:

- Rich in features such as batch scanning, text editing, and more .
- The free version does not impose watermarks, which is a significant advantage.
- The auto-capture feature is effective for quick scans.

Cons:

- Advertisements in the free version can be quite bothersome.
- Certain essential features, including OCR and watermarking, are only available through a paid subscription.

Reasons to Choose CamScanner: A feature-rich document scanning application.
 
Download CamScanner


6 Evernote

Evernote
Evernote, a widely used note-taking and organization application, features a straightforward scanning tool that enables users to scan and store documents directly within the Evernote platform. The Evernote Scannable app serves as an effective means to digitize all your physical notes and securely save them in Evernote.

The scanning application is quite basic in its functionality. Users can scan and edit documents with fundamental editing features such as rotation and cropping. It includes an auto-capture function that automatically detects documents. The quality of the scanned documents is high, and users can scan an unlimited number of documents.

Furthermore, the app allows for seamless integration with Evernote, enabling users to save scanned documents directly to their gallery. The application provides two-way flexibility; however, to utilize the app independently of Evernote, a subscription to a weekly or yearly plan is required, as all documents will be stored locally on the device. Connecting to Evernote is free, and users simply need to install the app to share and store documents directly.

Nevertheless, there are limitations to consider: Evernote restricts users to creating only 50 notes. For those who are new to Evernote, this means a maximum of 50 notes/documents can be saved. Existing free users may find this limit even more constraining, as they may have already utilized some of their quota. Conversely, Evernote Premium users enjoy increased limits. In summary, while Scannable facilitates the scanning and saving of documents to the Evernote app, free users face certain restrictions.

Advantages:

1. Extremely useful for current Evernote users.
2. Auto-capture feature streamlines the scanning process.
3. Free saving to Evernote (up to 50 notes).

Disadvantages:

1. The free version restricts users to 50 notes, which can be quickly exhausted.
2. Not recommended for individuals who do not use Evernote.

Reasons to Choose Evernote’s Scannable: Effortlessly integrate scanned documents into your Evernote account.
 
Download Evernote Scannable


7 iScanner: 

iScanner:

 
For those seeking a comprehensive scanning tool for their iPhone, iScanner stands out as an excellent choice. It provides a wide array of functionalities that enable users to scan, edit, merge, and even count objects with ease. Notably, the application maintains a strong focus on its primary scanning capabilities.

U sers can scan directly from the camera or import images from their files or gallery, converting them seamlessly into documents or PDF files. Additionally, it allows for the organization of these files into folders. Many features that are typically restricted to premium versions of other applications are readily available in iScanner.

Beyond its scanning capabilities, iScanner offers a variety of advanced functions, including object counting through the camera, document and ID card scanning, area measurement, password scanning, math problem solving, QR code generation, and more. Users can also sign documents, insert text, annotate PDFs, redact specific text, add images, merge PDFs, apply custom watermarks, convert PDFs to various formats, and engage with AI for chat and summarization.

However, a notable drawback of the application is the presence of advertisements, which can be intrusive even when the app is in standby mode. Users may encounter consecutive ads within a short span, which can be quite frustrating despite the app's numerous features. Nevertheless, the overall performance of the app remains commendable.

Pros:

- Valuable AI tools.
- The free version offers a substantial range of tools.
- Capable of managing all aspects from scanning to editing and organizing.

Cons:

- Ads can be frequent and disruptive in the free version.

Reasons to Choose iScanner: A comprehensive scanning and document management solution equipped with valuable AI features.

Download iScanner

How to Fix iPhone Battery Drain Fast


iPhone Battery Draining Fast
It is quite common for an iPhone battery to deplete more quickly than expected. This issue can arise from various factors, each of which has a specific solution. Whether the cause is a defective battery, an application malfunction, or a recent iOS update, this guide offers detailed instructions for diagnosing and resolving the issue. To address the problem of an iPhone battery draining quickly, please follow these steps sequentially.

Methods to Resolve iPhone Battery Drain


If you are experiencing rapid battery depletion on your iPhone, there are several strategies you can implement to rectify the situation. Most of these methods are straightforward and can effectively enhance battery performance.

1. Terminate malfunctioning applications. A malfunctioning application may deplete the battery of an iPhone. Typically, closing an application on an iPhone does not enhance battery performance. However, if an application is experiencing issues, it could lead to complications. To determine if an application is consuming excessive battery, navigate to Settings > Battery and review the list of active applications utilizing battery power. Identify any applications that are using a significant amount of energy and close them if necessary.

2.Establish a Wi-Fi connection or disable Wi-Fi. It is possible that you are outside the coverage area of a Wi-Fi or cellular network, causing the device to continuously search for a signal. If your iPhone is unable to connect to Wi-Fi or lacks service from your mobile provider, it will persistently seek a network, resulting in battery depletion. To mitigate this, either turn off Wi-Fi to prevent automatic connections or activate Airplane Mode to minimize battery usage.

3. Modify the screen brightness settings. The level of brightness on an iPhone can significantly influence battery longevity, as higher brightness levels require increased energy consumption. Disable the auto-brightness feature and manually adjust the screen to a lower brightness level, or activate Dark Mode. This mode alters the device's color scheme to darker tones, which are less demanding on battery resources.

4. Position the iPhone with the screen facing down when notifications arrive. Each notification triggers the illumination of the phone's display, leading to quicker battery depletion with an increase in notifications. By placing the iPhone face down, you can mitigate battery usage; the device will still receive notifications without activating the screen. If you do not need to check every notification, this practice can help preserve battery life. 

5. To conserve battery life on your iPhone, it is advisable to disable the Push Mail feature. When this setting is activated, the device continuously connects to email servers to check for new messages, which consumes power. Push Mail ensures a persistent connection that retrieves new emails and delivers them to your iPhone promptly .

By adjusting the Push Mail settings to check for updates every 15 minutes, you can remain informed without significantly impacting the battery life of your device.

6,Additionally, consider turning off the Raise to Wake feature. This function automatically activates the iPhone screen whenever the device is lifted or moved. While it eliminates the need to press the power button to view the screen, it can lead to unnecessary battery consumption with each movement. To disable this feature, navigate to Settings > Display and Brightness, and switch the Raise to Wake option to off (gray). Disabling Raise to Wake can enhance the overall battery performance of your iPhone.

7, Configure widgets and notifications. The Today View displays the current date and time, but its primary purpose is to accommodate widgets that provide access to your preferred applications. It is important to note that each widget consumes battery power to maintain connectivity and ensure data remains up to date. By minimizing the number of widgets, you can help prevent rapid battery depletion on your iPhone.

Factors Contributing to Rapid Battery Drain on Your iPhone


Following the release of iOS 13, numerous iPhone users have reported significant battery drainage issues. Many have observed their battery level dropping from a full charge to 20% within just a few hours. Additionally, there have been instances of iPhones overheating and unexpectedly rebooting, even when not actively in us e. 

iPhone Battery Draining Fast


How To Bypass iPhone Activation Lock Without Apple ID

Bypass iPhone Activation


When faced with an activation lock issue on your iPhone, it is necessary to provide the Apple ID credentials associated with the iCloud account linked to the device. However, if you are unable to recall your Apple ID, there is no need for concern. You have arrived at the appropriate resource for assistance .

Fortunately, there are multiple methods available to bypass the iPhone activation lock without the Apple ID. These include utilizing DNS, seeking assistance from the previous owner, employing an unlocking service, among others. This article outlines six free and reliable techniques to accomplish this task efficiently and effectively.

Part 1: How to Bypass iPhone Activation Lock Without Apple ID for Free


Although the procedures for bypassing the iPhone activation lock without an Apple ID can be somewhat intricate, we have succinctly detailed each method to enhance your chances of success. For those seeking a more straightforward and expedient solution, we recommend Method 4, which utilizes the “Passixer iPhone Unlocker.” Continue reading for further details .

Method 1: Bypass iPhone Activation Lock Using DNS (Applicable for iOS 8 or Earlier)

One widely used technique among users and technology professionals for bypassing the iPhone activation lock is the “DNS” method. This complex approach involves altering the DNS server settings of your iPhone's network to a specific numerical IP address, redirecting requests from Apple’s original server to an iCloud bypass DNS server for authentication. It is important to note, however, that this method limits access to certain functions on your iPhone, and you will need to modify the DNS server each time you connect to a different network.

 To circumvent the activation lock on an iPhone using DNS, follow these steps:

Step 1: Power off the iPhone and then power it back on. Proceed with the setup by choosing your country and preferred language.

Step 2: When you reach the Wi-Fi network selection screen, tap the "i" icon adjacent to the desired network and choose the option "Forget Network ."


bypass-iphone-activation-lock-
Step 3: Tap the “Info” icon again, but this time, select “More WiFi Settings”. Scroll to IP Address section and type any of the following addresses in the DNS area :

More WiFi Settings
USA/North America: 104.154.51.7  
Europe: 104.155.28.90  
Asia: 104.155.220.58  
South America: 35.199.88.219  
Rest of the world: 78.109.17.60  

Ensure that the IP address you choose corresponds to your current geographical location.

Step 4: After completing the previous steps, press "Back" and select "Join this Network." This action will prevent your iPhone from reverting to the activation lock screen. You have successfully bypassed the iPhone activation lock using DNS!

Method 2: Bypass iPhone Activation Lock with Assistance from the Previous Owner

If you prefer not to utilize the DNS method, you may seek assistance from the former owner. There are two ways in which they can assist you in this situation. The previous owner can either provide you with the previous screen passcode for the iPhone or help you disconnect the device from their iCloud account. Regardless of the option you choose, the following steps will guide you through the process :

Option 1: Request the Previous Screen Passcode

If the former owner is able to supply you with the previous screen passcode for the iPhone, follow these steps to bypass the activation lock.

Step 1: Below the "Password" section on the activation lock screen, you will see an option that states "Unlock with Passcode." Tap on this option.

Step 2: Enter the correct screen passcode provided by the previous owner and select "Next" to bypass the activation lock on your iPhone.
 
Wi-Fi network selection screen
Option 1: Request the owner to erase the iOS device through iCloud.com.

If the previous owner is unable to supply the screen passcode, instruct them to follow the steps outlined below to remotely erase the iOS device from their iCloud account via iCloud.com:

Step 1: Access iCloud.com using a web browser and log in to the iCloud account associated with the iPhone.

Step 2: Select “Find iPhone” and choose the "iPhone" that is protected by the activation lock.

Apple ID

Step 3: Click on “Erase iPhone” and choose “Remove from Account” to bypass activation lock. After that, restart the setup process and use a new Apple ID on your iPhone.

bypass-iphone-activation-
Method 3: Utilize an Online Unlock Service to Bypass iPhone Activation Lock

If the previous owner is unreachable, there is no need for concern. Numerous online unlocking services are available that can assist you in circumventing the activation lock on your iPhone. Typically, you will need to pay a nominal fee and supply specific information regarding your device, such as the IMEI number and model.

It is important to note, however, that not all online unlocking services can be deemed completely reliable. Nevertheless, you can generally trust well-known options such as DrSim and IMeinow .
 
Bypass iPhone Activation Lock
Method 4: [Guaranteed Method] Bypass iPhone Activation Lock Without Apple ID

Although the aforementioned methods may be worth exploring to bypass the iPhone activation lock without an Apple ID, it is essential to recognize that their success is not assured. For those seeking a more reliable and secure solution with a 100% success rate, Passixer iPhone Unlocker is the ideal choice.

Over the years, Passixer iPhone Unlocker has become the preferred DIY solution for numerous users facing the iPhone activation lock issue. This tool offers a straightforward and secure approach to bypass the activation lock, utilizing advanced algorithms. With just a few clicks, your iPhone can be successfully unlocked .

downlod


Additionally, Passixer iPhone Unlocker extends beyond merely bypassing the activation lock. It provides a variety of solutions, including the ability to bypass the screen time passcode, remove Apple ID, erase the screen passcode, eliminate iTunes backup passwords, and remove MDM, all without the need for complex configurations.

Key Features

- Quickly bypass activation lock on iPhones in any situation within seconds.
- Guarantees a 100% success rate for bypassing all types of locks across all iOS versions, including iOS 17, iOS 16, and earlier iterations.
- Facilitates the swift and effective removal of iTunes backup passwords and MDM from iPhones.
- Capable of bypassing both 4-digit and 6-digit screen time passcodes as well as iPhone screen passcodes.

Step 1: Open “Passixer iPhone Unlocker” on your computer (either Windows or Mac) and select “Bypass iCloud Activation Lock.

passixer-interface
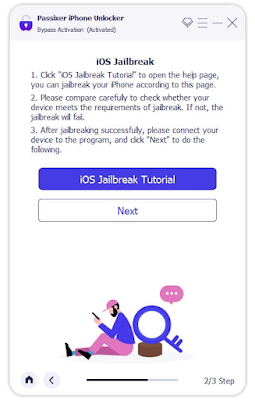
Step 2 (Optional): Jailbreak your iPhone. If you don’t know how to do this, click on “iOS Jailbreak Tutorial” to learn how to get the job done safely and securely. Then, click “Next” when you finish .
icloud-jailbreak

Step 3: Connect your iPhone to the computer, and Passixer iPhone Unlocker will automatically recognize and present your device information on the screen. Verify the details and select “Start Bypass Activation.”

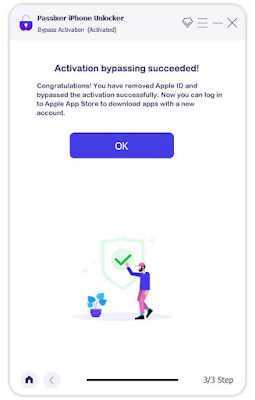
Step 4: The software will initiate the process to bypass the activation lock on your iPhone. After the process is finished, disconnect your iPhone from the computer and click OK.

Passixer

Part 2: Bypassing Activation Lock Without an Apple ID

If you are the rightful owner of an iPhone that is currently locked by activation, there are several methods available to swiftly bypass the activation lock screen. You may utilize the “Forgot Apple ID and Password” option or seek assistance from Apple support. Below, we outline the procedures for both methods.

Method 1: Resetting the Apple ID Using the "Forgot Apple ID or Password" Option

The official procedure for bypassing the activation lock on an iPhone that belongs to you involves resetting your Apple ID through the “Forgot Apple ID” and “Password” option. Once you have reset your Apple ID and password, you will be able to log into your account and disable the “Find My” feature on your iPhone. The following steps illustrate this process:

Step 1: Begin by Recovering Your Apple ID and Password

Access the “Apple ID Recovery” page at iforgot.apple.com using a different device. Input the email address or phone number associated with your account, enter the characters displayed in the image into the designated field, and click “Continue.

Apple ID”
If you can’t remember the Apple ID, tap on “Look It Up”.
look-up-apple-id

Step 2: Once you click “Continue”, you’ll be asked to provide the phone number linked to your Apple ID. Enter the correct number. You’ll receive a message on all of your Apple devices (iPhone, iPad, Mac, or other Apple devices).

Step 3: Tap on "Allow" and enter the device password. Then enter the new Apple ID password and confirm it.

recover-apple-id-password

 Once you finish the steps, go back to your iPhone and bypass the activation lock screen using your Apple ID and password.