Showing posts with label Windows. Show all posts

6 Best Free Data Recovery Software Tools of 2025

Data Recovery
Data loss happens more often than most realize. Whether it’s an accidental delete or a hard drive crash, losing important files can be frustrating. As data loss incidents increase, free data recovery software has become a vital tool for everyday users and small businesses alike. The good news? There are many reliable options available at no cost. In 2025, these tools are smarter, faster, and more capable, making data recovery easier than ever.

When choosing free recovery software, it’s important to find the right balance. You want a tool that’s easy to use, supports your device, and has a good chance of recovering your lost files. Let’s explore what makes a good free data recovery software and which ones lead the way in 2025.

What to Look for in Free Data Recovery Software

Key Features and Capabilities

The best free data recovery tools should support various file types—from photos and videos to documents and emails. Compatibility with many storage devices, like external drives, SD cards, and USB sticks, is a must. It also makes a difference if the software works on different operating systems like Windows, macOS, or Linux.

A user-friendly interface saves a lot of time, especially if you're not tech-savvy. Look for tools with simple steps to scan and recover. The depth of scanning and success rate are also crucial. Deep scans can find files lost deep within corrupted or formatted drives, increasing your chances of full recovery.

Limitations and Risks

While free tools are handy, they often have limits. They might restrict the number of files you can recover or certain advanced features. Beware of download sources—only choose reputable providers to avoid malware or data theft. Always read reviews and check the software’s privacy policies.

Using untrusted tools can put your data at risk. Choose reputable brands with good track records to ensure your files stay secure during recovery.

Top Free Data Recovery Software Tools of 2025

1.EaseUS Data Recovery Wizard Free

EaseUS Data Recovery Wizard Free
 EaseUS has been a trusted name for years. The free version allows users to recover up to 2GB of data. It’s perfect for restoring accidentally deleted files, lost partitions, or formatted drives. It supports many common file formats and is compatible with Windows and Mac.

This tool shines thanks to an intuitive interface and a high success rate. Its deep scanning can find files your other tools might miss. The only downside? The 2GB recovery cap. For larger data needs, an upgrade to the paid version is necessary.

2.Disk Drill Free Data Recovery

Disk Drill
Disk Drill offers powerful recovery abilities for free on Windows and Mac. It can recover files from corrupted, formatted, or damaged disks. The software uses advanced scanning algorithms and previews files before recovery, which saves time.

While the free version limits recovery to 500MB, it’s enough for most personal needs. Its reliable performance makes it a favorite among users who deal with complex data loss situations.

3. Recuva Free

Recuva
Recuva is a lightweight tool that’s perfect for quick, simple recoveries. It can retrieve files from your Windows PC, external drives, or memory cards. Its quick scan finds lost files fast, while the deep scan digs deeper for stubborn data.

Many users appreciate its portability—no installation needed. It’s especially useful if you want a fast, no-fuss recovery. The free edition offers essential features, but advanced options are only in paid versions.

4.Stellar Data Recovery Free Edition

Stellar Data Recovery
 
Stellar is known for its quality tools. The free edition allows recovery from SD cards, external drives, and internal storage. It supports many file types and offers a quick scan to save time.

While the free version has a recovery size limit, it’s good for small-scale needs. Stellar’s interface is simple, making it easy for beginners to recover their files confidently.

5.MiniTool Power Data Recovery Free

MiniTool Power Data Recovery
 
MiniTool provides a broad set of recovery options, including deleted file recovery and damaged partition repair. Its clean interface makes it easy to navigate even for non-tech users.

The free version has a recovery limit of 1GB but covers most basic needs. If you require more storage in recovery, the paid upgrade unlocks more features.

6.PhotoRec

PhotoRec
 
PhotoRec is different. It specializes in recovering files from almost any file system, supporting hundreds of formats. It’s open-source and has no recovery size limits, making it versatile.

The catch? Its interface is command-line based, which can be daunting for beginners. Still, tech-savvy users appreciate its power and flexibility for tough recovery tasks.

How to Choose the Best Free Data Recovery Tool

Compatibility with Your System and Device

Always pick a tool that supports your operating system and storage media. Using software incompatible with your system is a waste of time.

Recovery Capabilities

Match the tool’s features with your data loss scenario. For minor accidental deletions, most tools will do. But for formatted drives or corrupted files, choose one with deep scan options.

Ease of Use and User Interface

A simple, clear interface makes recovery smoother. Complex tools might offer more features but can be overwhelming.

Data Privacy and Security

Opt for software from trusted developers. Any recovery tool handles sensitive files, so privacy is key.

Limitations and Upgrade Paths

Understand what free versions offer. Some may restrict recovery size or features. Check if paid upgrades are available if needed.

Best Practices for Effective Data Recovery

Immediate Action Steps

As soon as you notice data loss, stop using the affected drive. Continuing to write new data can overwrite the files you want to recover. Connect the drive to a stable system and run the recovery software immediately.

Data Backup Strategies

Prevention is better than cure. Regular backups protect against future loss. Use cloud services, external drives, or physical safes for your copies.

Testing and Verifying Recovered Data

Always open recovered files to confirm they’re intact. Use checksum tools or compare against previous versions for important data.

Expert Insights and Recommendations

Data recovery specialists agree that choosing the right free tools depends on your need. For simple deletions, Recuva or MiniTool work great. For complex cases, Disk Drill or Stellar can be more effective.

Industry stats show that recovery success rates are improving with newer algorithms and stronger scans. Protect your data by implementing security best practices—strong passwords, updated antivirus software, and regular backups.

Conclusion

Having reliable free data recovery software in your toolkit makes all the difference when disaster strikes. Match your specific needs with the right tools—whether it’s quick recovery or deep scans for damaged disks. Always keep in mind the importance of preventative measures like backups. With the right approach and the best free recovery tools of 2025, you can recover your critical data without costly expenses. Stay prepared, stay safe.

Windows 11 ISO Download Official Direct Download Links

Windows 11 ISO Download
To obtain the Windows 11 ISO file, you may utilize the direct links available in the article, which lead to secure official ISO files, or you can download them directly from Microsoft’s official website. Additionally, we have provided instructions for installing Windows 11, bypassing minimum requirements, and assisting with the initial setup process.

Whether you aim to perform a clean installation of Windows or resolve an existing issue, downloading and installing Windows via a bootable USB can be advantageous. You can acquire a copy of Windows 11, create a bootable drive, and proceed with the installation on your computer. There are numerous methods available for downloading ISO files, and I have outlined various approaches along with a guide to eliminate PC requirements for installing Windows 11.

Downloading the Windows 11 ISO File

Windows 11 can be downloaded officially from the Microsoft website or through Google Drive links, allowing you to save the file directly to your device. Numerous third-party options also facilitate straightforward downloads of Windows 11 ISO files. For a more streamlined process, you may utilize the official Microsoft Media Creation Tool to create a bootable version of Windows.

Latest: Download Windows 11 24H2 Update

The latest Windows 11 24H2 update has begun to roll out to all users. This update introduces new AI features for devices that support Copilot, along with various enhancements to the current Windows 11 operating system.

If you are utilizing a Copilot-enabled PC or are currently running Windows 11, you can download and install the most recent update on your device. Please refer to the ISO installation guide to bypass system requirements and install the latest Windows update using ISO files. Prior to proceeding, here are some known issues that users have encountered following the update to the 24H2 version .

Download Windows 11 24H2 English

Download Windows 11 24H2 German

Download Windows 11 24H2 Spanish 

 Download Links for Windows 11 ISO on Google Drive

While Microsoft provides a straightforward method for downloading the Windows 11 ISO, the process involves several steps. To simplify this, we have taken the initiative to download and upload the ISO to Google Drive, enabling you to obtain it with just one click. This method is both legal and secure, and I will ensure that the file is updated in accordance with the latest releases from Microsoft.

Download Windows 11 Disk Image (ISO) for x64 devices (English)

Download Windows 11 Disk Image (ISO) for x64 devices (Chinese)

Download Windows 11 Disk Image (ISO) for x64 devices (German)

 Obtain Windows 11 Through the Media Creation Tool

Windows 11 can also be acquired via the official Media Creation Tool provided by Microsoft. This tool allows you to either create a bootable USB drive or upgrade your existing Windows installation to the most recent version. It is user-friendly and provides step-by-step guidance throughout the process. Additionally, it guarantees that you receive the latest version of Windows. The tool is available at no cost for users of Windows 10 or Windows 11 .

 Download Windows 11 Installation Media

Download Windows 11 [23H2] ISO From Adguard

Adguard provides an extensive catalog of software and operating systems available for download. While it does not feature the most recent Windows versions, users can access all editions of Windows 11 (prior to 23H3) through the website.

Download the Windows 11 ISO file from Adguard

Download Windows 11 ISO File From Softonic

Additionally, the Windows 11 ISO file can be obtained from the well-known third-party platform, Softonic. This site also offers various programs and Windows 11 in multiple languages. To download, simply visit the website, click on the Download link, and proceed with the file download.

Download Windows ISO file via Softonic

Download Windows 11 Nano Version

Windows Nano represents a streamlined variant of Windows 11, being 40 percent lighter and utilizing fewer system resources. The most recent iteration of Nano Windows 11 is Nano11 23H2 V1, which is based on Windows 11 build 22631.3155. Notably, in the Nano version, the Microsoft Store is substituted with WingetUI, and Microsoft Edge is not included by default, among other modifications.

You can download and install Nano Windows on any compatible device in the same manner as standard Windows, utilizing Rufus. If you wish to install Nano Windows on your device, please refer to the installation guide provided below . 

Download Nano Windows 23H2 V1

 Instructions for Installing Windows 11 ISO Files

After downloading the ISO file, there are several methods available for installing Windows 11 on your device. You may select any approach that suits your requirements. For instance, if you wish to upgrade your current Windows installation while retaining your files, applications, and settings, you can simply mount the ISO file on your computer and initiate the setup process. Alternatively, if you prefer a fresh installation, you can create a bootable USB drive, which can also be utilized to install Windows 11 on additional devices. These two methods are among the most straightforward and are highly recommended for modern PCs .

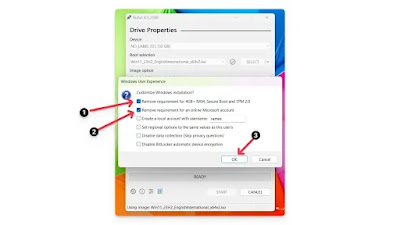
Furthermore, you have the option to burn the ISO file to a DVD for use with older devices or employ the official Windows Media Creation Tool to facilitate the installation of Windows 11 on your computer. In cases where your PC does not meet the minimum system requirements for Windows 11, you can utilize Rufus, an open-source application, to create a bootable USB drive that allows you to bypass these requirements. This tool enables you to circumvent limitations related to TPM, RAM, and the necessity for an online account when installing Windows 11 on your device. Prior to proceeding with the installation of the Windows 11 ISO file, it is essential to review the minimum PC requirements for your device. However, these restrictions can be easily removed using Rufus .

 1. To create a bootable Windows drive utilizing Rufus,

 begin by visiting the Rufus website. Navigate to the Download section and select the most recent version to initiate the download. After the download is complete, double-click the file to proceed with the installation of Rufus on your computer.

Download-rufus-website
Step 2: Now, plug in a USB drive. Ensure that it has at least 8GB of space. Remove and back up any important files from the USB drive.
 
Setup-Refus-to-create-bootable-drive
Step 3: Open Rufus and select your USB drive. Click Select and choose the Windows 11 ISO file you have downloaded.

Remove-minimum-requirement-
 Step 4: Choose GPT as the partition scheme and UEFI as the target system. Name the volume label (e.g., “Windows 11”).

Allow-rufus-to-format-your-drive

 Step 5: Leave the file system as NTFS and click Start. 

Creating-bootable-drive-using-Rufus

Step 6: Confirm the installation and wait for the process to complete.

 Conclusion

To install Windows 11 ISO files without encountering complications, adhere to the outlined steps. Recent updates from Microsoft now provide official public links for downloading Windows 11 files. Furthermore, with certain modifications, it is possible to install Windows 11 on devices that do not meet the standard requirements. Activation of Windows can be completed later through the settings menu. If your previous installation of Windows 11 was activated, the new installation should automatically activate as well .

Before proceeding with an update or performing a complete data wipe to install a fresh version of Windows, it is advisable to back up your data. You may encounter the message ‘This PC can’t run Windows 11’. To resolve this, ensure that you select options to eliminate restrictions when creating a bootable USB with Rufus. Another frequent issue is the absence of a media driver, which can be rectified by using a different USB port or downloading the latest driver. Additionally, partition issues may arise; to address this, confirm that your PC has sufficient storage available.

How to Fix “Can't Reach This Page” Error on Microsoft Edge

Can't Reach This Page

Microsoft Edge, while being the second most widely used desktop browser following Chrome, is not without its technical issues. A common error encountered is the message: “Hmm, we can’t reach this page.” Although restarting the browser may resolve the problem, there are several alternative solutions to consider if the issue persists.

Basic Troubleshooting Recommendations


Prior to attempting any advanced fixes, it is advisable to start with these fundamental troubleshooting steps.

1. Address Edge’s High RAM Consumption

At times, Microsoft Edge can exhibit excessive RAM usage. If feasible, assess and rectify the high memory consumption associated with Edge.

2. Clear Cache and Browsing History

In certain instances, clearing the cache and removing browsing history can enhance the overall performance of the browser.

3. Test in an InPrivate Window

Consider accessing the website through an InPrivate window. To do this, click on the three-dot menu located in the upper right corner of Edge and select New InPrivate Window.

4. Investigate Other Technical Issues

Additionally, it is prudent to ascertain whether the problem is isolated to a specific web page. Verify this by visiting other websites in Edge and attempting to access the same site in a different browser or on another device using Edge .

If the issue pertains to a specific website, it may be due to one of the following reasons: the website is experiencing technical difficulties, its server is currently down, or the website owner has restricted access based on your IP address or geographical location.

In the event of a technical malfunction with the website—evident when the site fails to load across all devices and browsers—patience is required until the issue is rectified. To eliminate this possibility, consider utilizing a VPN or reaching out to the website administrator to request the unblocking of your IP address.

Should the problem manifest on multiple pages on a specific computer, further investigation is warranted.

2. Verify Your Internet Connection

If you frequently encounter the "can’t reach this page" error in Edge, the issue may lie with your internet connection. Ensure that you are properly connected to the internet.

One method to confirm this is to disconnect and then reconnect to your Wi-Fi network; however, a wired connection may provide more stability.

Additionally, you can assess whether the internet is the source of the problem by conducting a speed test. This can be easily accomplished by entering "speed test" into a search engine. Notably, some search engines, including Google and Bing, offer the capability to perform the test directly within the search results without the need to navigate to a separate website.


bing-internet-speed-test
3. Modify Your DNS Server

A potential reason for the "can’t reach this page" error in Microsoft Edge may be related to the configuration of your DNS server. Adjusting your DNS server settings could resolve this issue.

Typically, you are utilizing a DNS server provided by your internet service provider (ISP). Switching to a DNS server operated by Google or Cloudflare could not only rectify the problem but may also enhance your browsing speed.

Although you have the option to select any DNS server of your choice, the following instructions illustrate how to substitute your current DNS with that of Cloudflare.

Windows 10

If you’re on Windows 10, follow these steps to change your DNS:

windows-10-change-dns-settings
1. Navigate to the Network and Sharing Center by scrolling through the options available.  
2. Select Change adapter settings from the left sidebar.  
3. Right-click on the desired network connection and choose Properties.  
4. In the Networking tab, locate Internet Protocol Version 4 (TCP/IPv4) and double-click it.  
5. Select the option for Use the following DNS server addresses.  
6. Input “1.1.1.1” in the Preferred DNS field and “1.0.0.1” in the Alternate DNS field.  

For users operating on Windows 11, the following steps outline the process for modifying your DNS settings:

Windows 11

If you’re on Windows 11, here’s how to change your DNS:


altering-the-dns-settings-in-windows-11
1. Access the Hardware properties section.  
2. Locate the DNS option and select the Edit button linked to it.  
3. Enable IPv4 and input “1.1.1.1” and “1.0.0.1” in the Preferred DNS and Alternate DNS fields.  

The following are the primary and alternate DNS settings provided by Cloudflare, Google, and OpenDNS that can be utilized for your new DNS server:  

- Cloudflare: 1.1.1.1 and 1.0.0.1  
- Google: 8.8.8.8 and 8.8.4.4  
- OpenDNS: 208.67.222.222 and 208.67.220.220  

Verify if these DNS configurations resolve the Edge error.  

4. Disable IPv6  


IPv4 (32-bit) and IPv6 (128-bit) represent the two principal types of IP addresses. When a browser attempts to connect to a website, it initially searches for IPv6 addresses. If none are found, it defaults to IPv4 addresses. Although IPv6 is generally faster than IPv4, its unavailability can result in delays and may cause your Edge browser to crash, leading to ongoing discussions regarding the preference for IPv4 or IPv6.

To deactivate IPv6 on Windows 11, please adhere to the following instructions:

1. Press Windows + I to access the Windows Settings application .
2. Select Network & Internet.
3. In the left sidebar, choose Wi-Fi (if you are connected wirelessly) or Ethernet (if you are using a wired connection).
4. Click on Hardware properties.
5. Next to IP Assignment, select Edit > Manual, and then switch IPv6 to the off position.

For Windows 10, please complete steps 1 to 3 as mentioned above before proceeding with the subsequent actions.

windows-10-disable-ipv6

1. Access the Network and Sharing Center by clicking on it.  
2. In the left sidebar, select the option to Change adapter settings.  
3. Right-click on your network connection and choose Properties.  
4. Within the Networking tab, deselect the checkbox for Internet Protocol Version 6 (TCP/IPV6).  
5. Confirm the changes by clicking OK.  

Additionally, it is possible to disable IPv6 on macOS devices, and the procedure is generally simpler on a Mac.  

After disabling IPv6, restart Microsoft Edge and attempt to connect to the problematic page to check if the issue has been resolved.  
 

5. Disable Microsoft Edge Extensions  

Consider disabling all browser extensions, also referred to as Microsoft Edge Add-ons, particularly ad-blockers or any extensions that may directly interfere with the browser's scripts.  

To disable add-ons in Edge:  

- Click on the three-dot menu button in Microsoft Edge.  
- Select Extensions and then Manage extensions.  
- Toggle off any extensions you wish to disable.  

Browser extensions consume computing resources and may also impact network bandwidth, thereby affecting internet connectivity and overall browser performance.  
 

5. Reset Microsoft Edge  

If necessary, reset Microsoft Edge to restore all settings to their default state. The steps to do this are as follows:  

1. Launch Microsoft Edge and click on the three-dot menu located in the upper right corner.  
2. From the dropdown menu, select Settings.  
3. In the sidebar, choose Reset Settings.  
4. Click on Restore settings to their default values.  
5. Confirm by clicking Reset in the popup window.  

Resetting-Microsoft-Edge-Browser-in-Settings

Resetting your browser settings to their default configuration typically addresses the majority of issues encountered. Please restart Edge to determine if you can now access the desired page. However, if the "can’t reach this page" error persists in Edge, it may be advisable to consider using an alternative browser.

Transitioning from Microsoft’s browser may be challenging for dedicated Edge users, yet there are several other viable options available. Firefox provides a focus on privacy, as do DuckDuckGo and Tor. Additionally, Opera and Chrome are commendable alternatives. Furthermore, there is an increasing variety of AI-driven web browsers to explore.

6 Best Windows Music Players 2024


Microsoft's operating system has consistently provided integrated solutions such as Windows Media Player (referred to simply as Media Player in Windows 11) and the discontinued Groove Music. Nevertheless, many Windows users tend to seek out their own preferred music playback applications.

For audiophiles, however, the quest becomes more complex. When looking for a music player that accommodates high-resolution audio formats like FLAC, MQA, or DSD, the choices become limited. Therefore, we have compiled a list of the top high-resolution music player applications available for Windows.

1. Hysolid 

Hysolid
1. If your computer is connected to a high-quality Hi-Fi system, Hysolid may be precisely what you need. This application is not conventional media player software; rather, it converts your PC into a music player that can be controlled via your iOS device (although an Android version exists, it is currently nonfunctional). Simply relax on your couch, select the music you wish to enjoy, and your PC will stream it through your Hi-Fi system. There is no requirement to log into Windows.

Hysolid supports a wide range of high-resolution audio formats. The application is compatible with PCM audio, including WAV and FLAC files up to 384kHz, as well as DSD formats ranging from 2.8MHz to 11.2MHz in DSF format. Additionally, Hysolid can indicate the operating mode of the USB DAC in use and confirm whether playback is bit-perfect.

 Download: Hysolid (Free) 


2. MusicBee 

1. MusicBee is an ideal choice for those seeking a straightforward and aesthetically pleasing interface without compromising on performance. This lightweight application launches swiftly while offering a multitude of features. Users can fine-tune audio settings using either a 10-band or 15-band equalizer, along with various DSP effects. Unlike many other software options, MusicBee is compatible with high-end audio cards, should your computer be equipped with one.

Additionally, MusicBee provides support for gapless playback, logarithmic volume scaling, normalized volume streaming, and synchronization with Android devices. If you have previously utilized WinAmp with plugins, you can seamlessly import those plugins into MusicBee to enhance your listening experience. This music player also boasts customizable skins, Last.fm integration, CD ripping capabilities, and a range of other functionalities.

 Download:MusicBee (Free)

3. Plexamp


1. Plexamp distinguishes itself from other media players by serving solely as a front-end interface for the complimentary Plex Media Server software. Users can upload their music to the server, which may operate on the same machine as Plexamp, allowing for seamless listening. A significant advantage of this setup is the ability to access your music library from virtually anywhere.

The software accommodates standard high-resolution audio formats and is capable of playing DSD files. However, it is important to note that while Plexamp offers sample rate matching on macOS, Linux, and iOS devices, this feature is not available on Windows. Consequently, if one seeks bit-perfect audio on a Windows system, the standard Plex application must be utilized instead of Plexamp.

A key advantage of the client/server model employed by Plex and Plexamp is its resemblance to creating a personalized version of a streaming service like Spotify. Regardless of whether you are using a Windows PC or a mobile device, you will have access to the same songs, playlists, and recommendations, a feature that is often lacking in more conventional music player applications.

Download:Plexamp (Free, Plex Pass adds features starting at $4.99/month) 


4. Audirvana 

Audirvana

 1. An alternative worth considering is Audirvana, which emphasizes user control over audio streaming from the source to the output. If you possess a robust computer and aim to utilize it for processing high-quality audio, this application merits your attention. For instance, Audirvana is capable of executing advanced algorithms that alleviate the burden on your DAC, thereby preventing oversampling.

Additionally, this application is compatible with VST3 plugins, which can be beneficial for audiophiles seeking to enhance their listening experience, whether by applying equalization or analyzing their favorite tracks through a spectrum analyzer. While Audirvana is not inexpensive (it offers a 30-day free trial), the extensive capabilities of the application may justify the investment.

 Download: Audirvana ($119.99)

5. Foobar2000 

1. Foobar2000 is widely recognized as one of the leading music players for Windows, earning its status as a familiar name among users. Although its interface may appear somewhat outdated, the application is known for its speed, configurability, and, most notably, its cost-free availability. While there are other free players available, Foobar2000 stands out as the sole option that closely resembles a traditional lightweight media player.

The software natively supports FLAC format, although it does not support DSD. To enable DSD playback, users must install the Super Audio CD Decoder add-on, which can be obtained from SourceForge. With this component added, Foobar2000 transforms into an even more robust audio player. This information is particularly useful for those who are already familiar with and appreciate the features of Foobar2000.

Download: Foobar2000 (Free)  


6. JRiver 


 1. JRiver is a versatile software application designed to cater to a wide range of users. Fortunately, it appears to excel in nearly all of its intended functions. It offers bit-perfect audio playback in both lossless PCM and DSD formats. The audio subsystem is compatible with either ASIO or WASAPI, ensuring flawless audio transmission to your digital-to-analog converter (DAC).

Several features that may seem fundamental are surprisingly absent in other media players. One notable example is the optional audiophile-grade crossfeed. According to the developers, this feature enhances headphone listening by creating a more natural and less fatiguing experience, akin to the sound produced by speakers in a room.

 Download: JRiver ($69.98 for Windows-only license, $89.98 for Windows, Mac, and Linux combined license)

How to create ISO image of hard drive in Windows 10


Creating an ISO image of a hard drive in Windows 10 allows you to make a complete backup of the drive's contents, including the operating system, applications, and files. Here's how you can create an ISO image of a hard drive for free:

  1. Download and Install Disk2vhd:


    • Disk2vhd is a free utility from Microsoft Sysinternals that allows you to create VHD (Virtual Hard Disk) images of physical disks.
    • Visit the Disk2vhd webpage (https://docs.microsoft.com/en-us/sysinternals/downloads/disk2vhd) and download the ZIP file containing the utility.
    • Extract the contents of the ZIP file to a folder on your Windows 10 computer.
  2. Launch Disk2vhd:

    • Navigate to the folder where you extracted the Disk2vhd utility and double-click on the "Disk2vhd.exe" file to launch the program.
  3. Select Hard Drive to Image:

    • In the Disk2vhd interface, you'll see a list of available physical drives on your computer.
    • Check the box next to the hard drive you want to create an ISO image of. Ensure that the drive has enough free space to store the resulting VHD file.
  4. Choose Destination and Options:

    • Below the list of drives, specify the destination where you want to save the VHD file. You can save it to an external USB drive, network location, or another internal drive.
    • Optionally, you can customize the options for the VHD file, such as whether to create a single VHD file or split it into multiple files, and whether to include the disk's page file or not.
  5. Create VHD Image:

    • Once you've configured the settings, click on the "Create" button to start the process of creating the VHD image.
    • Depending on the size of the hard drive and the speed of your computer, this process may take some time to complete. Be patient and allow Disk2vhd to finish creating the VHD image.
  6. Verify VHD Image:

    • After the VHD creation process is complete, navigate to the destination folder you specified earlier and verify that the VHD file has been created successfully.
  7. Convert VHD to ISO (Optional):

    • If you specifically need an ISO image instead of a VHD, you can convert the VHD file to an ISO using third-party software like ImgBurn or PowerISO. These tools allow you to create ISO images from various disk formats, including VHD.

By following these steps, you can create an ISO image of a hard drive in Windows 10 for free using the Disk2vhd utility from Microsoft Sysinternals.