Generally, iPhone gets disabled when you enter the wrong security passcode too many times and this is a time when you can no longer enter or try any more passcodes to unlock your phone. It is obvious that you would get worried as you would have been locked out of your device with no access to your personal files and folders. Worry not! This is not a terminal problem and can be conveniently fixed. You can follow any of the methods discussed in this article to know how to reset a disabled iPhone. By the following methods of reset, all the phone’s data will get wiped off.
Way 1: How to Reset Disabled iPhone without iTunes/iCloud
Tenorshare 4uKey is an effective software which has been designed to fix a disabled iPhone without the use of iTunes for restoring data. Using this software is easy and very simple and is the best solution if your iPhone is disabled or if you have been locked out of your iPhone. To know how you can use this to reset disabled iPhone, follow the steps below.
Step 1: Download, install and launch Tenorshare 4uKey on Mac/laptop.
Step 2: Connect your disabled iPhone to this Mac/laptop by using a USB cable and click on “Start”.
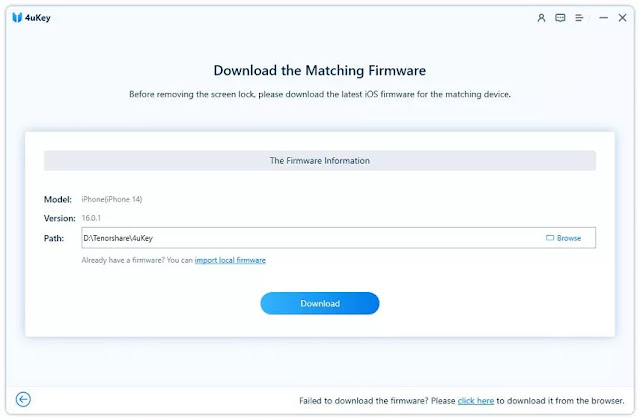
Step 3: Choose the location/path where you want to download and store the Firmware package and then click on “Download”
Step 4: After the latest package has been downloaded to the specified location, click on “Unlock Now” to remove your iPhone’s passcode and restore your iPhone as well.
Your iPhone will now be restored to the original factory settings along with this the passcode will also be removed. You can download the backup from iTunes or iCloud. This method shows how to reset disabled iPhone without iTunes.
Way 2: How to Reset a Disabled iPhone with iTunes
know how to restore disabled iPhone to the factory settings with the help of iTunes, follow the steps below.
Step 1: With the help of a USB cable, connect your disabled iPhone to your Mac/laptop.
Step 2: Tap iPhone and go to Summary tab.
Step 4: Once the backup is created, click on “Restore”.
Step 5: If at all “Find My iPhone” is enabled, you will have to disable it to continue.
Step 6: iTunes will then ask if you want to restore your iPhone to Factory Settings, confirm by tapping on “Restore and Update”.
All the data on your phone including the passcode will then be erased. Everything can be restored by a created backup by click on “Restore from iTunes backup”.
If in case you have never synced your iPhone with iTunes, you will have to go to Recovery mode and recover your device. Follow these steps below.
Step 1: Connect your iPhone to the Mac/laptop with the help of a USB lightning and launch iTunes on the device.
Step 3: If you are using an iPhone XS, X, 8 or 8 Plus, switch off your device and force restart your device by pressing and releasing volume up and down button. After this, press and hold the side button until the Recovery Mode screen (Connect to iTunes) appears.
it can come up with unexpected connection errors. If you still want to If you are using iPhone 7 or 7 plus, switch it off, press the volume down button and side button together till Recovery Mode is displayed on the screen.
If you are using iPhone 6S or any other earlier versions, switch it off and press the top button and home button till Recovery Mode display screen appears.
Step 4: After force restarting the device using the above-mentioned method and entering recovery mode, click on “Restore”
Step 5: Again, when prompted click “Restore and Update” to download new software and go for full restoration.
You can now see that all the data on your iPhone will be removed including the passcode. You can reset the passcode by going to the phone settings and you can restore the mobile data by choosing any of the phone’s backup.
Way 3: How to Restore Disabled iPhone with iCloud
To use this option to unlock your iPhone you should have enabled “Find My iPhone” on iCloud. If not then you would have to use any of the above two methods to restore your iPhone which is disabled. And this is a major restriction for first-time users because they can be unaware of this rule. In case you know it and you have enabled “Find My iPhone”, then follow the steps below to restore disabled iPhone.
Step 1: Take another device or a Mac/laptop and open your browser, from there navigate to icloud.com/#find.
Step 2: Sign in using your iCloud Apple ID details and click “All Devices” and select the device which you want to reset and click on “Erase iPhone
Why Choose 4uKey to Reset iPhone when It’s Disabled
Among the above-mentioned 3 ways, which is the best way to reset a disabled iPhone? Well, it depends on whether you can use iTunes/iCloud. Sometimes you may not be able to connect a disabled iPhone with iTunes, or have not enabled Find My iPhone to use iCloud, therefore you can get the choice with 4uKey. The following tablet will help you understand better why it’s recommended to use 4uKey to reset a disabled iPhone.


No comments:
Post a Comment